Upload Local Data Using the Data Upload Feature
You can add data to a table in Lakehouse through the "Data Upload" feature on the Singdata Lakehouse web interface.
Instructions
- Suitable for smaller local files (not larger than 2GB) (CSV, TXT, Parquet, AVRO, ORC) to be directly uploaded to a table in Singdata Lakehouse without programming, making it the simplest method.
- Currently, only one file can be uploaded at a time.
- The data upload feature does not support parsing fields of struct, map, and array data types in the file.
Using the Data Upload Feature
When using the data upload feature, you can create a new table or upload data to an existing table.
Creating a New Table
When uploading data, you can usually create a new table for the data at the same time.
Prerequisites
You need to meet the following conditions to use this capability
- You have one of the following roles: workspace_admin, workspace_dev, workspace_anylst
- Or you have the following permission points: create table, insert + update, delete + insert + update
Steps
-
Log in to your Singdata Studio account
-
You can click "Upload Data" in the following places
- Instance Homepage -> Data Upload
- Development -> Data Tree on the left
- Data Asset Map -> Data Upload
- Data Asset Map -> Data Management -> Data Tree -> Data Upload
-
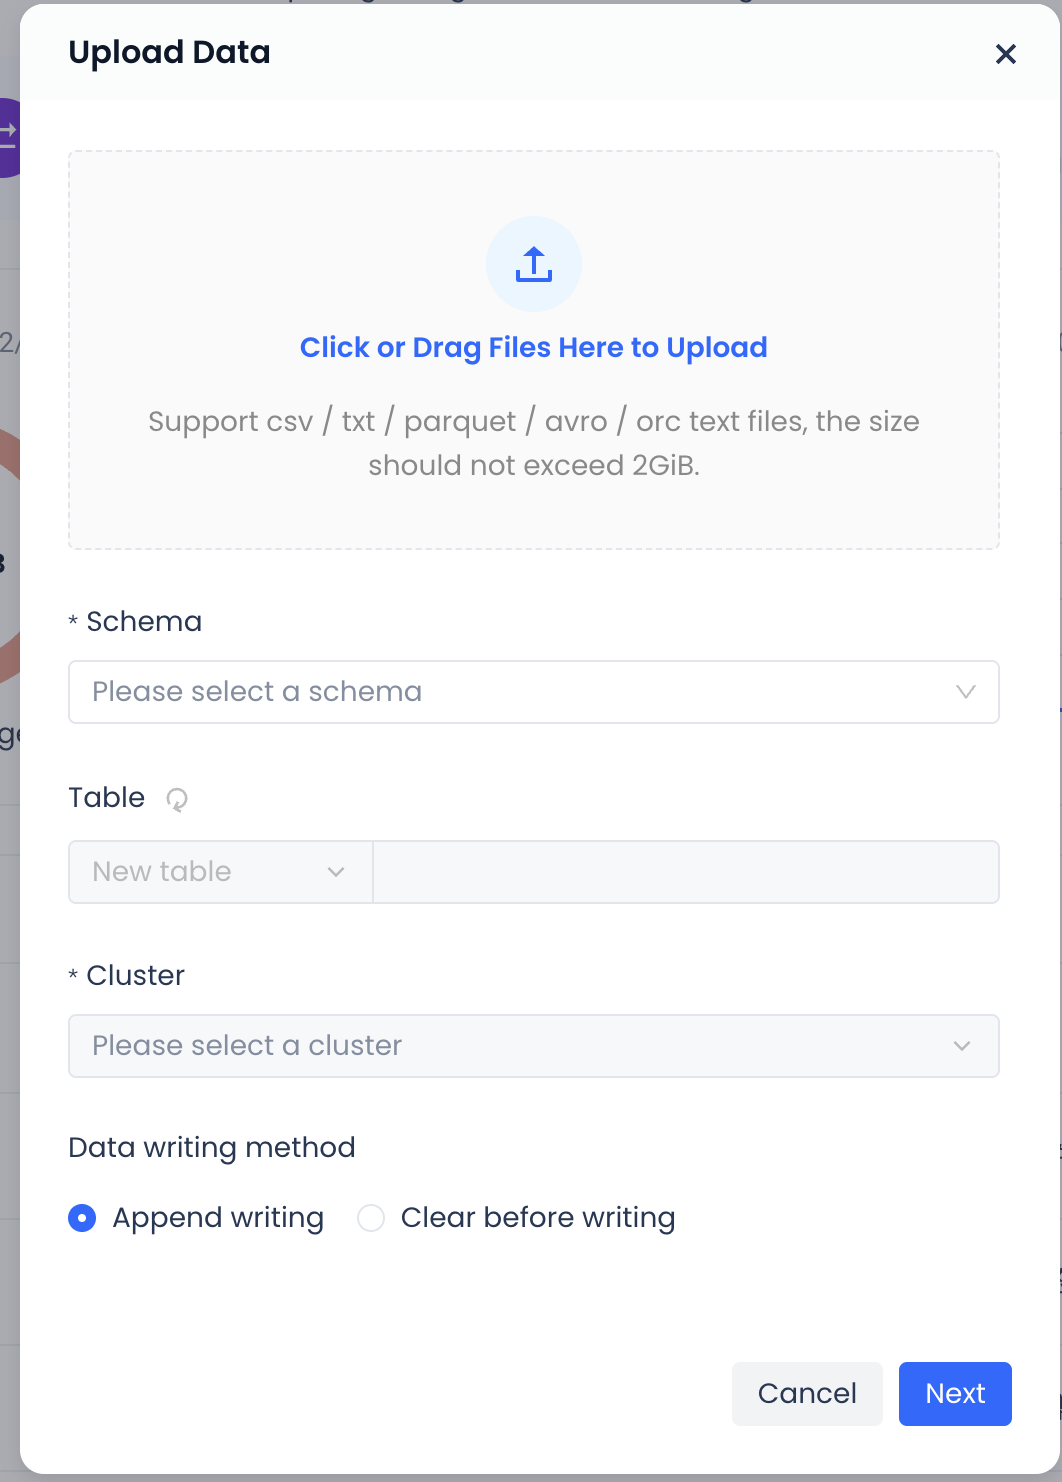
You can add local files by dragging and dropping, or by clicking to browse files on the local system. Only one file can be added at a time, and the size must not exceed 2GB.
-
Schema: Choose to create the table under a certain schema.
-
Select Table: Choose "Create New Table" and enter the new table name in the field behind.
-
Cluster: Available clusters under the workspace where the current schema is located.
-
Data Import Method: Supports two methods of importing data into the new table: append write and clear before write.
-
After confirming all the information, click "Next". The system will automatically parse the field information in the file based on the uploaded file information.
-
Check and judge whether the automatically parsed field names and field types meet expectations. If confirmed to be correct, click "Confirm" to complete the data upload and create a new table. If there is a problem with field parsing, you can modify the File Properties configuration item to refresh and obtain the automatically parsed field names, field types, etc. Or manually modify the field names or field types. Note: The modified field types may not match the system's parsing, resulting in unsuccessful uploads.
Upload Data to an Existing Table
Prerequisites
You need to meet the following conditions to use this capability
- You have one of the following roles: workspace_admin, workspace_dev, workspace_anylst
- Or you have the following permission points: create table, insert + update, delete + insert + update
Steps
-
Log in to your Singdata Studio account
-
You can click "Upload Data" in the following places
- Development -> Data Tree -> Table -> Upload Data
- Data Asset Map -> Data Management -> Data Tree -> Table -> Upload Data

-
You can add local files by dragging and dropping, or by clicking to browse files on the local system. Only one file can be added at a time, and the size must not exceed 2GB.
-
Schema: Choose to create the table under a certain schema.
-
Select Table: Choose "Existing Table".
-
Cluster: Available clusters under the workspace where the current schema is located.
-
Data Import Method: Supports two methods of importing data into the existing table: append write and clear before write.
-
After confirming all the information, click "Next".
-
Configure the parsing of the uploaded file accordingly.
-
File Type: The system will automatically parse the file type based on the format suffix of the uploaded file. Users can also choose other file types themselves, but they need to ensure that the selected file type matches the uploaded file type.
-
File Properties Configuration:
-
Header:
- First row as header: Parse from the first row of the file, and directly parse the first row as "field names" and match them with the existing table. If there is no match, it will be judged as a failure.
- No header: Ignore the first row and start reading from the second row as values.
- Skip the first N rows: Set the number of rows to skip, and start reading from row N+1 as values.
-
Field Wrapping Characters:
- Double quotes: Under the column delimiter setting, parse the content within the "" double quotes as field values. Recommended option.
- Single quotes: Under the column delimiter setting, parse the content within the 'single quotes as field values. Here is the translated Markdown content:
-
- Empty: All information after the column delimiter will be parsed as fields.
-
Line break: Set the handling method for line breaks. For Windows systems, it is \r\n; for Linux and MAC systems, it is \n.
-
Null value representation: Specify the representation of null values in the file.
-
Column delimiter: The delimiter between columns, only a single character is allowed. For CSV files, the default is a comma.
-
Encoding: UTF-8, GBK
-
Stop on error:
- Stop immediately: Stop reading immediately upon encountering an error and return an error message.
- Ignore errors: Ignore error lines until all data is read, and return information about the error lines.
- Set fault tolerance lines: Stop reading when the number of error lines exceeds the set value, and return an error message.