Task Development and Orchestration
Overview
"Development" refers to the big data development IDE, integrating both stream and batch development, providing developers with an efficient and intelligent development environment. It supports users in task development, debugging, configuration scheduling, and submission and release operations, completing the key processes of big data aggregation, processing, and analysis.
Click "Development" in the left navigation menu to enter the main interface.
Interface Overview
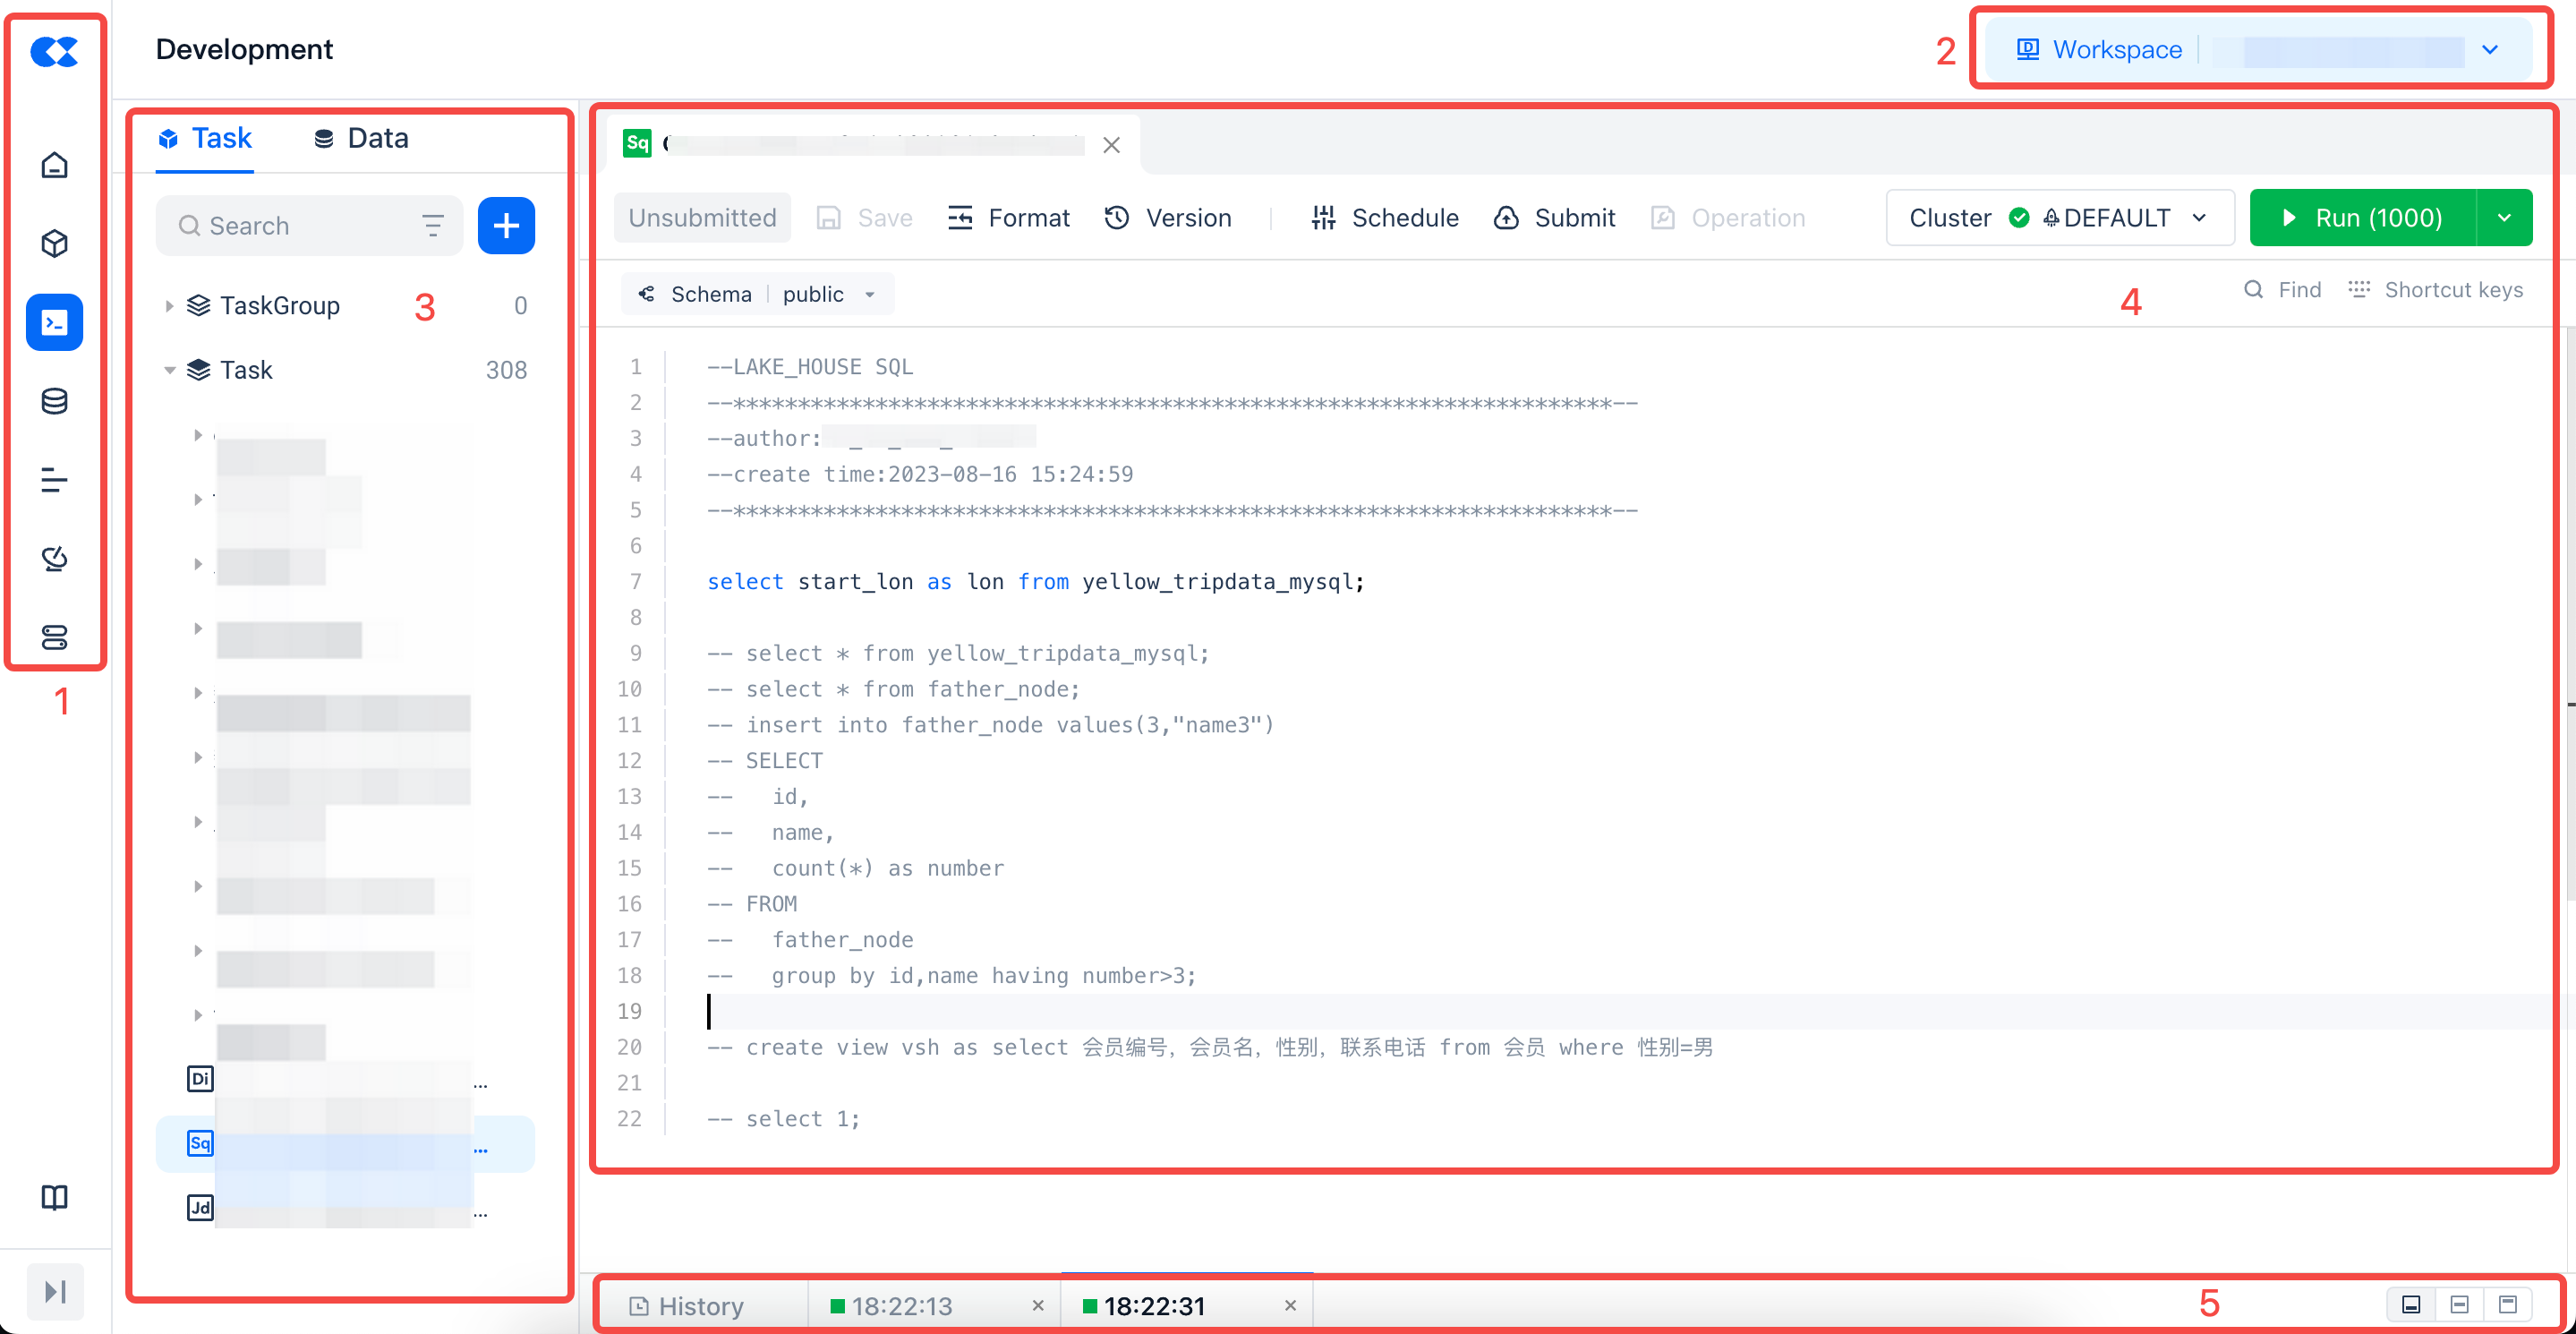
| No. | Function |
|---|---|
| 1 | Function Switch |
| 2 | Switch Workspace: This section displays the name of the current data development project space and the region you are in. You can click the dropdown icon to switch to other project spaces. |
| 3 | Development Directory Tree: The directory tree is used to manage task codes in an orderly manner. You can create directory trees according to business needs to manage tasks by category and hierarchy. |
| 4 | SQL Compilation Area: The main operation interface for development, with different types of compilation areas having different operation interfaces. |
| 5 | Execution Results: Presents the results after running the operations in the SQL compilation area. |
Directory Tree
The data development module displays all tasks under the current project in the form of a directory tree, making it easy to add, delete, modify, and query tasks.
The supported operations on the directory are as follows:
-
Switch tab: Switch the type of the directory tree below by clicking the tab, i.e., task directory tree or data directory tree.
-
Task Directory Tree: The list below shows all tasks in the current space.
-
Data Directory Tree: The list below shows all data directory trees in the user's region, presented in the hierarchy of workspace-schema-table/view.
-
New: Create folders and various development tasks by clicking the + button on the directory tree.
-
Development Task Types: Real-time synchronization, offline synchronization, SQL script, Python script, shell script
-
Filter Tasks: Supports filtering tasks by development task type, submission status, and responsible person.
-
Refresh: Refresh the current directory tree information.
-
Search Tasks: Search and locate specific tasks based on task name or path.
-
Task Name: Fuzzy match keywords with "task name" to return file directories or tasks that meet the criteria.
-
Path: Fuzzy match keywords with the path where the task is located to return file directories or tasks that meet the criteria.
-
Create Subdirectory & Create Subtask: When hovering over a subdirectory, more icons will appear, allowing the following operations:
-
Current Directory is a Folder: Create any task type, new folder, delete, rename at the current level.
-
Current Directory is a Task: Open task, create a copy, copy name, rename, move, delete at the current level.
Operation Instructions:
- Create Copy: Copy the current task, including the scheduling configuration within the task.
- Copy Name: Copy the current directory name.
- Rename: Rename the directory name.
- Move: Move the directory to another directory within the project. If the directory contains subdirectories or tasks, they will be moved together.
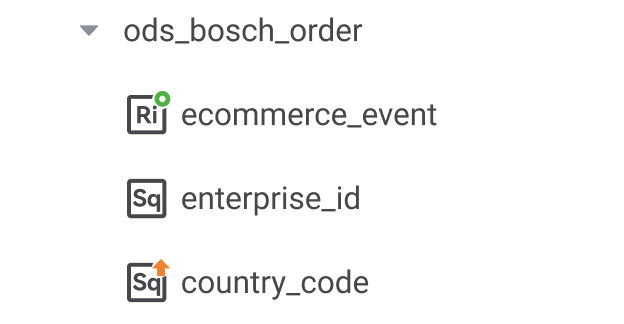
- Delete: Delete the directory.
- Task Directory Tree: Icons distinguish task types, and colors distinguish online status.
| Status Legend | Description |
|---|---|
 | After the task is submitted, the saved version differs from the submitted version. |
 | After the task is submitted, the server's saved version is consistent with the submitted version. |
 | After submitting the task, click the offline operation. |
 | Other status types. |
| Icon Legend | Description |
|---|---|
| Real-time synchronization |
 | Offline synchronization |
 | SQL script |
 | Shell script |
 | Python script |
Task Development Process
The data development module is based on the underlying engine capabilities of Lakehouse, providing various development types. Users can choose the task type for interactive data development work.
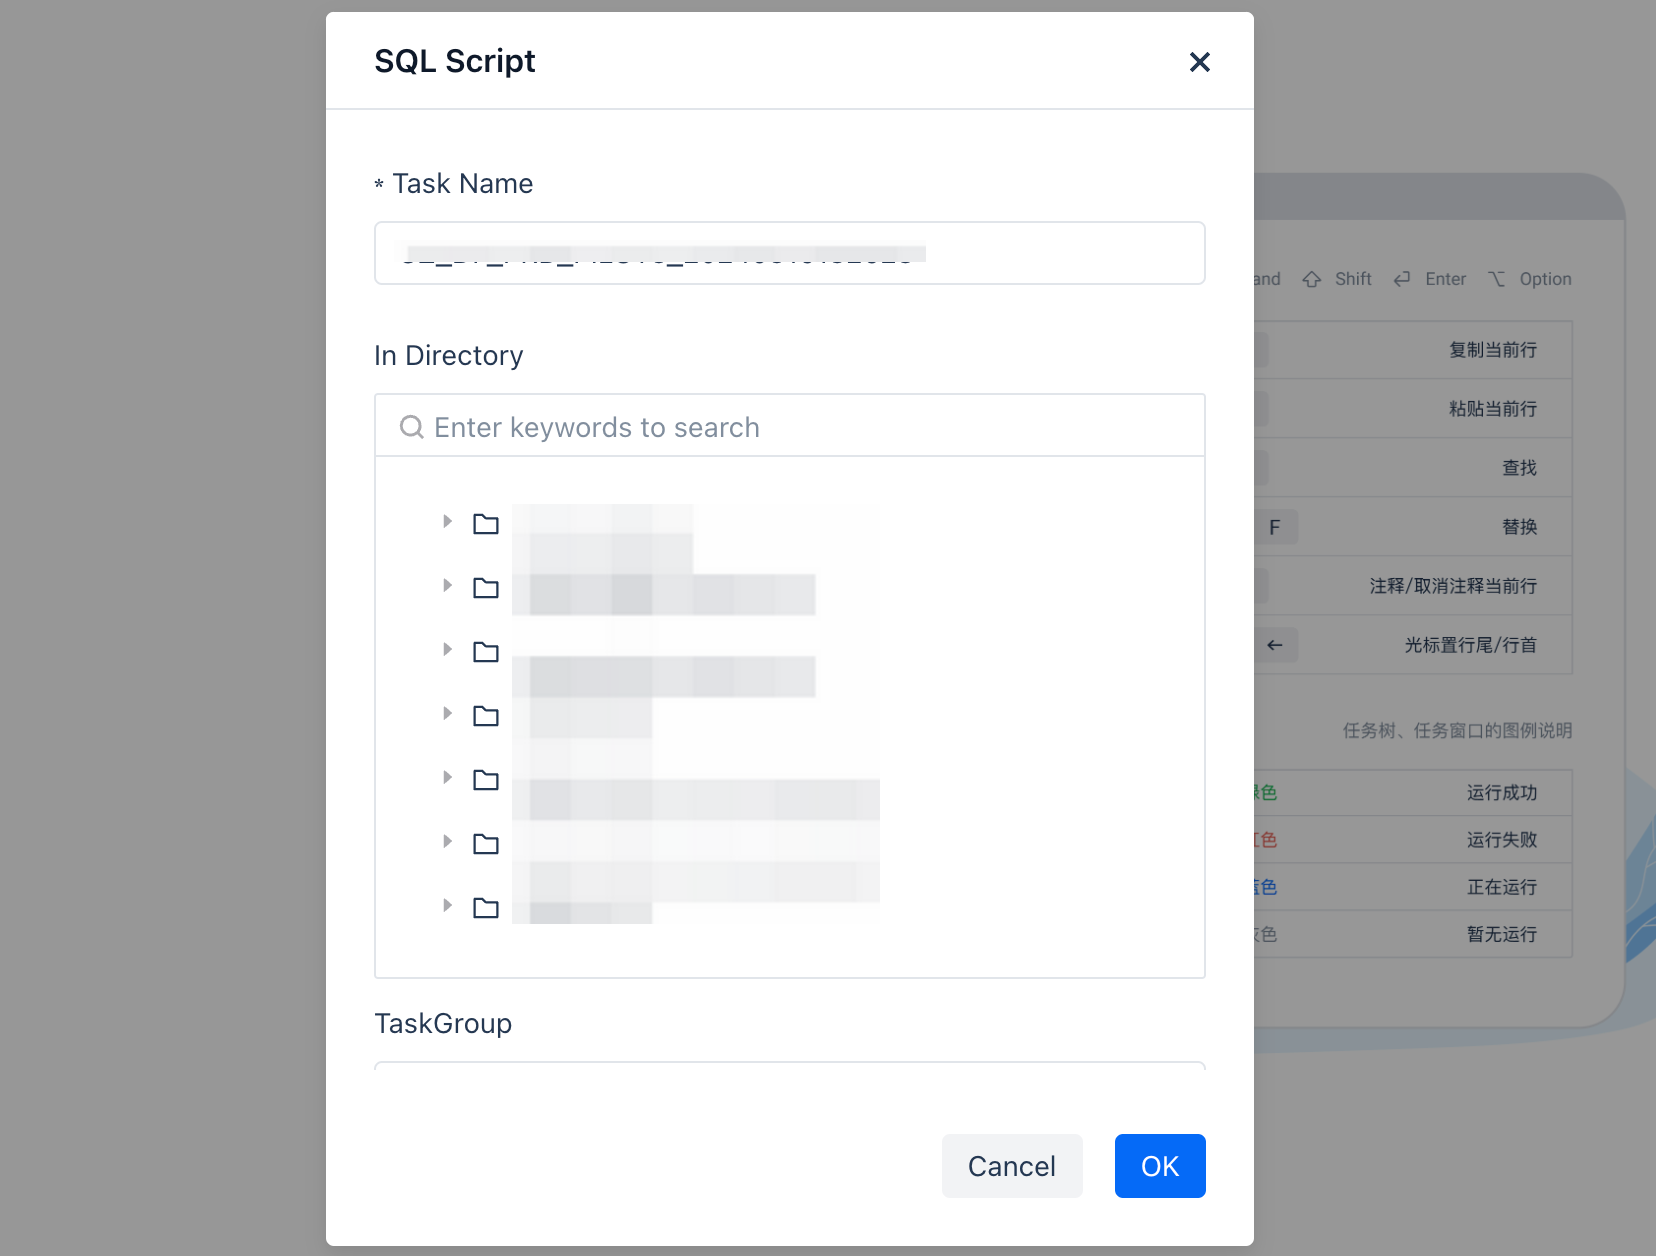
Create a New Task
Currently, two types of task nodes are supported: data integration and data development.
After clicking "New", select the specific development type, a pop-up window will appear. Enter the task name, select the specific directory level where the current task needs to be saved, and then enter the development interface.
Operation Bar Description
Task Tab

After the user clicks the task directory tree on the left or creates a new task node, the task tab will open (or locate). In the task tab bar, users can perform the following operations:
New: Users can click the "+" sign in the tab status bar to quickly create a new task, which is saved by default under the root node of the current space.
Close Tab: When the mouse hovers over the tab, a downward button appears, allowing the user to perform batch closing operations on the task tab.
Tab color status correspondence:
| Status Icon | Description |
|---|---|
| Green | Run successfully |
| Red | Run failed |
| Blue | Running |
| Gray | No run |
SQL Functional Area

| No. | Function Name | Description |
|---|---|---|
| 1 | Save | Save the task, including the current node code and related configurations. |
| 2 | Formatting | Formats the written code to make its syntax structure look concise and clear |
| 3 | Parameters | Not yet online. |
| 4 | Versions | Click on Versions to view the committed and saved versions of the current task. Supports code viewing and rollback between versions. |
| 5 | Scheduling | Click to pop up the sidebar window for scheduling settings. For detailed configuration, see Scheduling Settings. |
| 6 | Submit | The "Submit" function is only needed for tasks that require scheduled dispatch. After "Submit", the task will be submitted and published to the Operations Center, and will run according to the configured schedule. Before submission, scheduling configuration is required. For detailed configuration, see Scheduling Settings. |
| 7 | Operations | Click to enter the "Operations" center. |
| 8 | Task Flow Description | Hover the mouse over the tips of the task flow to display the online flowchart of the development task. |
| 9 | Cluster Filtering | The "default" shown in the figure indicates the Virtual Cluster required for task execution. You can click to switch and select other Virtual Clusters. To add a new Virtual Cluster, you can operate in "Compute". |
| 10 | Run/Stop | Run/Terminate the code of the current node. When running SQL code, it supports running selected parts of the code. |
SQL Editing Area
- Schema Switching: Click the dropdown box to switch the schema in the current workspace, default is public.
- Shortcuts: Various capabilities supported in the Studio development compilation area. For details, see Others: Common Shortcut Operations.
- SQL Editing Area: The SQL compiler in the Studio development function provides the following features to enhance the efficiency of data development and data analysis.
| Function | Description |
|---|---|
| Code Folding | Collapse code blocks to reduce reading interference. |
| Real-time Syntax Error Prompt | Prompt users of syntax errors found during code writing to help avoid mistakes. |
| Syntax Highlighting | Use different colors or fonts to highlight keywords and syntax structures in the code in the editor or IDE to enhance readability. |
| Intelligent Completion | Automatically complete keywords, function names, variable names, etc., in the code based on context and known information to improve coding efficiency and accuracy. |
| Partial Code Execution | Run only a part of the code instead of the entire program to quickly test small segments of code or debug errors. |
Orchestration
After the task testing is completed and everything works well, submit it to the operations system for orchestration. You need to configure the scheduling properties of the task. You can click "Scheduling" in the SQL function area.
Basic Information
| Parameter | Description |
|---|---|
| Person in Charge | Required. Only one member is allowed, defaulting to the task creator. It can be modified to other members within the workspace as needed. |
| Description | Optional. You can provide a detailed description of the task for future reference and management. |
| Run Attributes | Required Normal Scheduling: Scheduled according to the user's set scheduling rules. Dry Run Scheduling: When a task's logic temporarily does not need to run, but you do not want to change the entire data link relationship, you can set it to dry run, and the task will be marked as successful. Pause: After setting the task to "Pause Scheduling" and publishing it to the operations center, the entire task status will be "Paused", no task instances will be generated, and data supplementation operations can be performed. |
| Cluster | Required. Used to define the scheduling resource group used when the task is published to the production environment for scheduling and running. |
| Schema | Required. Used to define the prefix schema used when the task is published to the production environment for running. |
| Task Priority | Optional. Specifies the scheduling priority for Lakehouse SQL tasks, supporting 10 configurable levels (0-9) where higher numerical values indicate elevated execution precedence. |
| Parameter Configuration | Click "Add Parameter" to add a new parameter. Click "Load Parameters in Code" to automatically load parameters already used in the code. In the code, parameters are referenced as: '${bizdate}', note that the quotes are English quotes. Note: More system built-in parameters will be supported in future versions. |
Scheduling Time

| Parameter | Description |
|---|---|
| Scheduling Cycle | Daily Scheduling: When selected, the scheduling will be executed daily. Monthly Specific Day Scheduling: Users can choose specific dates each month for scheduling. Weekly Specific Day Scheduling: Users can specify specific dates on a weekly basis. |
| Scheduling Frequency | Execute Once: When the user selects to execute once, only the start scheduling time needs to be configured. Execute Multiple Times: When the user selects to execute multiple times, the scheduling interval, start scheduling time, and end scheduling time need to be configured. |
| Effective Time | The date from which the task becomes effective. |
| Expiry Time | The date from which the task becomes ineffective. |
| Preview Scheduling Time | Click to preview the scheduling time to see the specific run times after configuration. |
| Parameter Configuration | Click "Add Parameter" to add a new parameter. Click Load Parameters in Code to automatically load the parameters already used in the code. In the code, the way to reference the parameter is: '${bizdate}', note that the quotation marks here are English quotation marks. Note: More system built-in parameters will be supported in subsequent versions. |
Instance Information
Studio supports two instance generation methods: Effective the next day and Effective after release.
| Parameter | Description |
|---|---|
| Instance Generation Method | Effective after release: The method of instant instance conversion. After release, the task instance of the day will be generated immediately and run according to the configured schedule time. Effective the next day: The task instance will be scheduled to run the next day. |
| Instance Retry on Error | Instance retry attribute, mainly considering data idempotency, to set whether the task instance can be retried. Please set as needed. Can be retried after success or failure Cannot be retried after success, can be retried after failure Cannot be retried after success or failure |
| Automatic Retry Count | Custom retry count |
| Instance Timeout Duration | Not enabled Custom |
| Preview Schedule Time | Click Preview Schedule Time to view the specific running time after the schedule is configured. |
| Parameter Configuration | Click "Add Parameter" to add a new parameter. Click Load Parameters in Code to automatically load the parameters already used in the code. In the code, the way to reference the parameter is: '${bizdate}', note that the quotation marks here are English quotation marks. Note: More system built-in parameters will be supported in subsequent versions. |
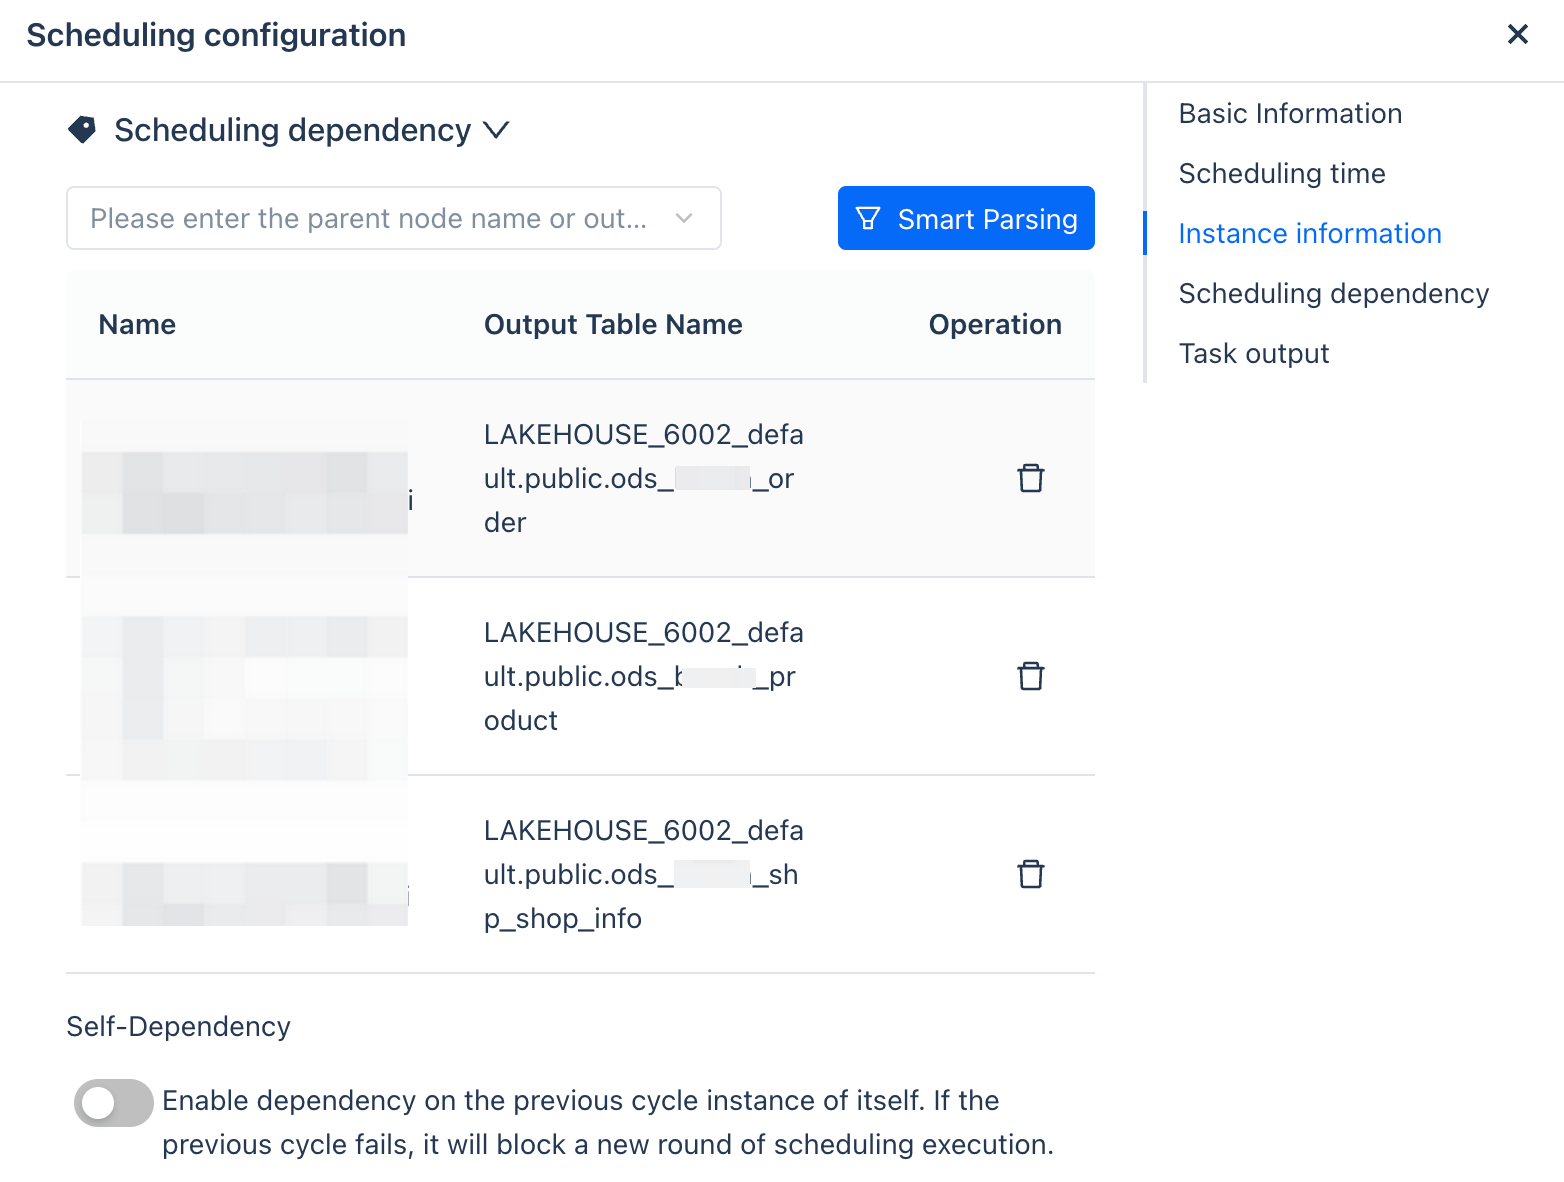
Scheduling Dependencies
Complex production tasks usually have upstream and downstream dependencies, such as DWD processing tasks that need to depend on ODS layer tasks. In the "Scheduling Dependencies" configuration, you can add upstream tasks that the current task depends on. The supported methods are:
Parent node's file name
Table name produced by the parent node
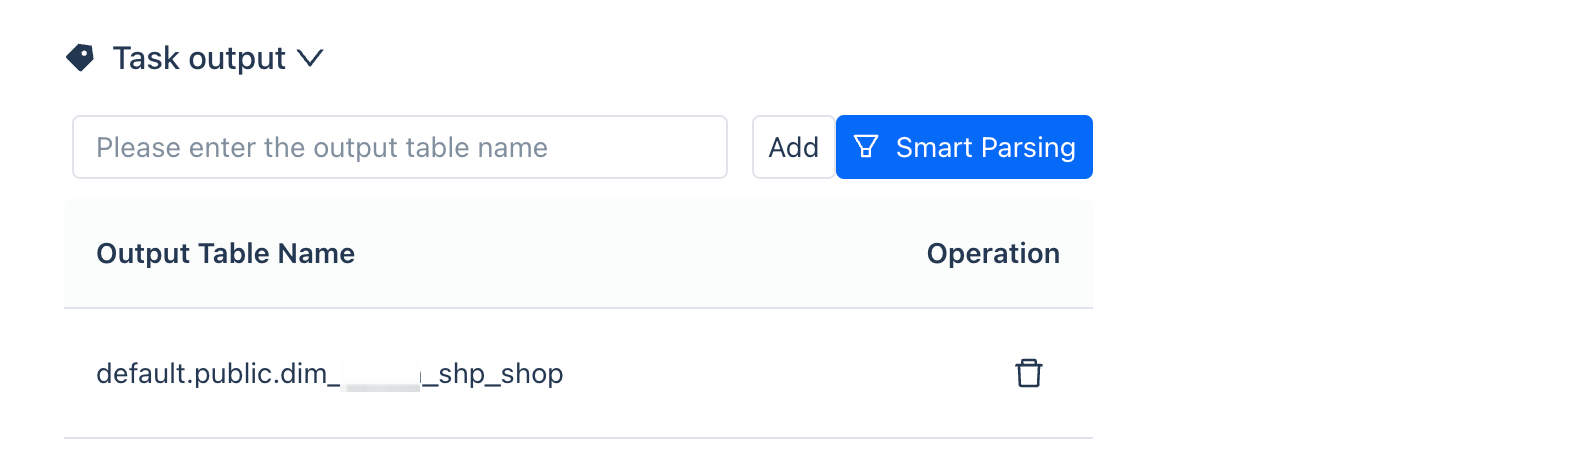
Task Output
There are two ways to configure the task output information:
Method 1: Automatically generate the output table name through the code mentioned above.
Method 2: Manually add by searching the table name.
Submit for Release
Click the Submit for Release button in the function bar above the editor to submit the task.
Operations and Maintenance View
Click to jump to the "Operations and Maintenance" center to view task operations and maintenance.
Running Results
Running History
The running history provides the running result data of the current task tab for the past 7 days, up to 20 entries.

Running Results
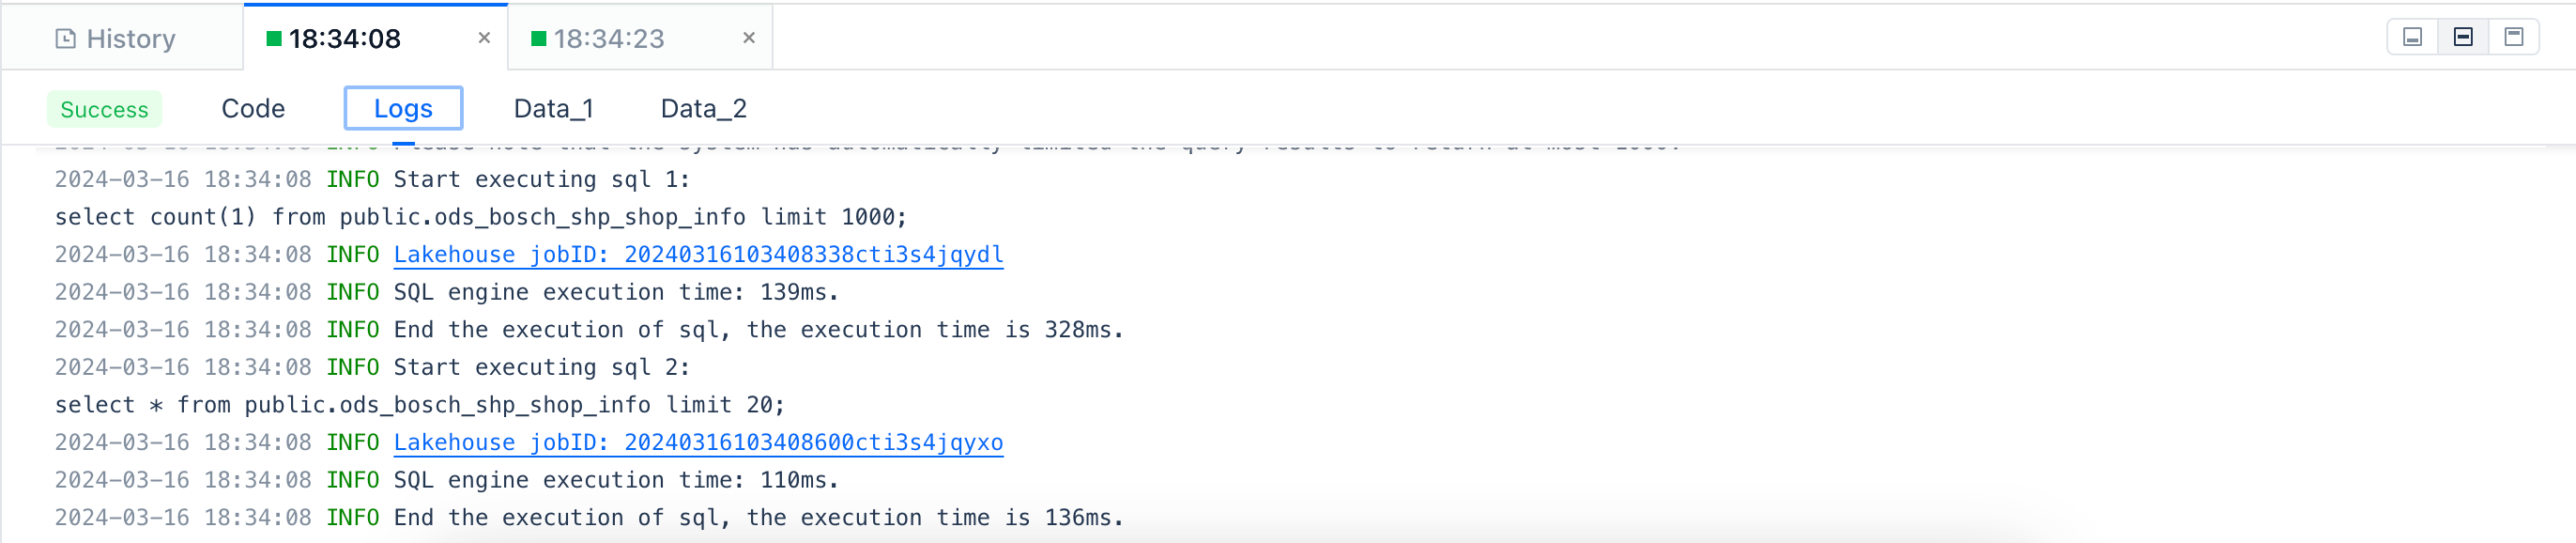
Logs
SQL jobs can be diagnosed based on logs. For details, please see JOB PROFILE. After clicking to run the task, you can view the detailed log information of the task in the log area at the bottom of the page.
You can adjust the log display area by using the expand and collapse buttons.
You can force refresh the logs using the refresh button.
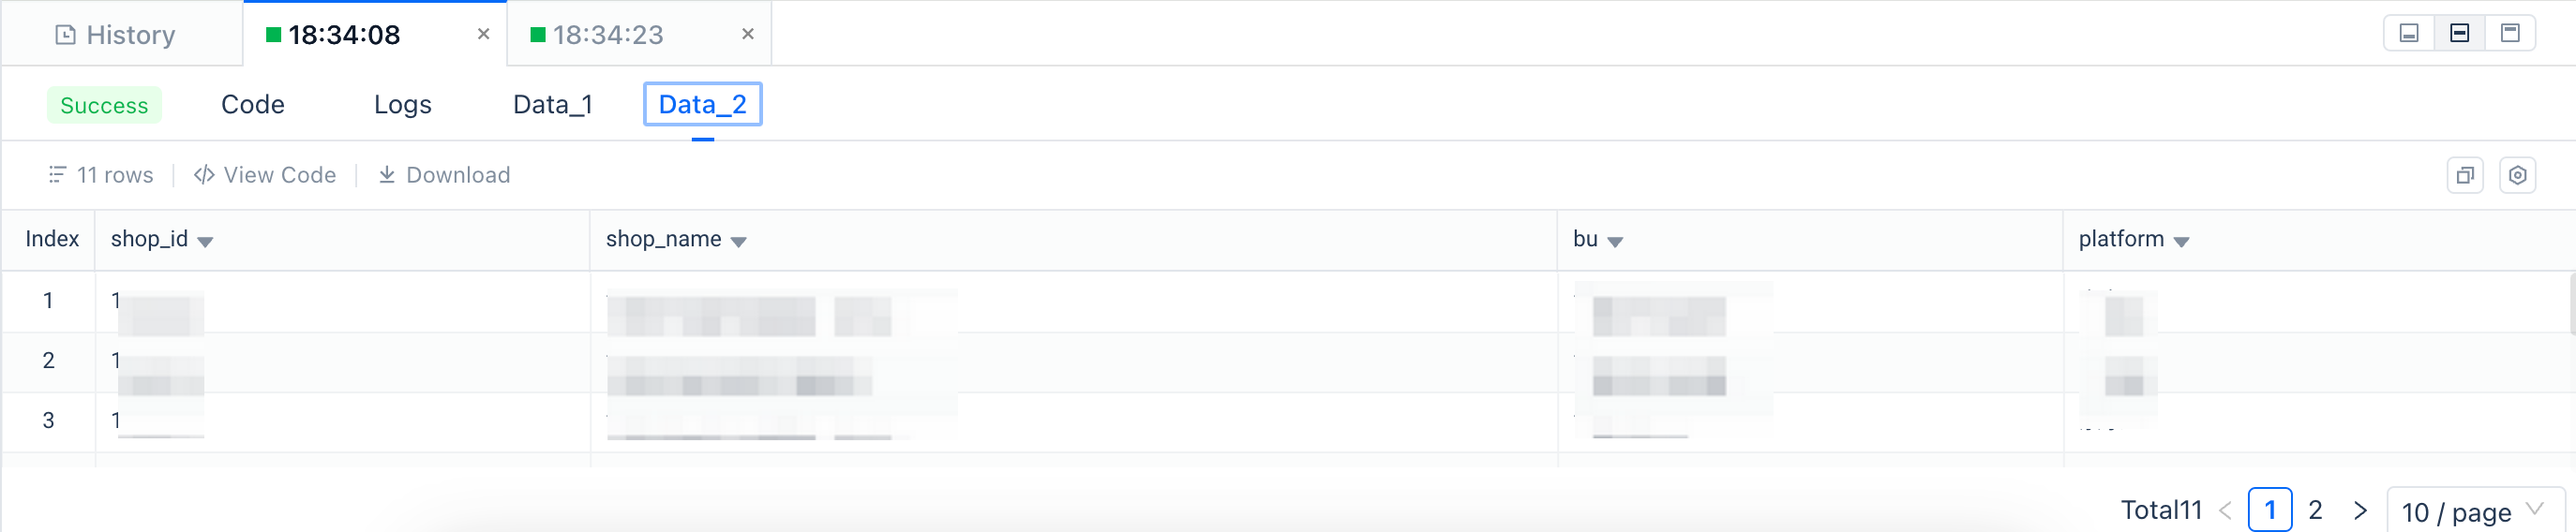
Data
After the task is completed, for those with results returned (such as SELECT statements), the results will be displayed through the "Data" tab:
Others: Common Shortcut Operations
In the code editing box, the following shortcuts are currently supported to help improve editing efficiency:
Save
- MAC: CMD + s
- Windows: Ctrl + s
Comment or uncomment the line or code block where the cursor is located
- MAC: CMD + /
- Windows: Ctrl + /
Cut the line or code block where the cursor is located
- MAC: CMD + x
- Windows: Ctrl + x
Copy the line or code block where the cursor is located
- MAC: CMD + c
- Windows: Ctrl + c
Paste
- MAC: CMD + v
- Windows: Ctrl + v