Create STORAGE CONNECTION
Storage Connection is mainly used to store the authentication information of third-party storage services, allowing Lakehouse to securely access and manage the data in these storage services.
- Currently supported object storage locations are Tencent Cloud COS, Alibaba Cloud OSS, and AWS S3.
- Cross-cloud vendor creation is not currently supported. For example, if your Lakehouse is hosted on Alibaba Cloud but the object storage is on Tencent Cloud.
Create OSS Storage Connection
The goal of this step is to allow the Lakehouse cluster to access object storage OSS on Alibaba Cloud. To achieve this goal, you can use two authentication methods provided by Alibaba Cloud: Access Key and Role Authorization.
Based on AK Key Method:
You only need to provide the AccessKey ID and AccessKey Secret information of the account with access to OSS permissions. Use this information to create a Storage Connection object, as shown in the example below:
Role-Based Authorization Method (RoleARN)
You need to create a role and a permission policy: the permission policy represents the access policy for the OSS service, and this policy is authorized to the created role.
The following mainly describes the specific steps for the role-based authorization method (RoleARN):
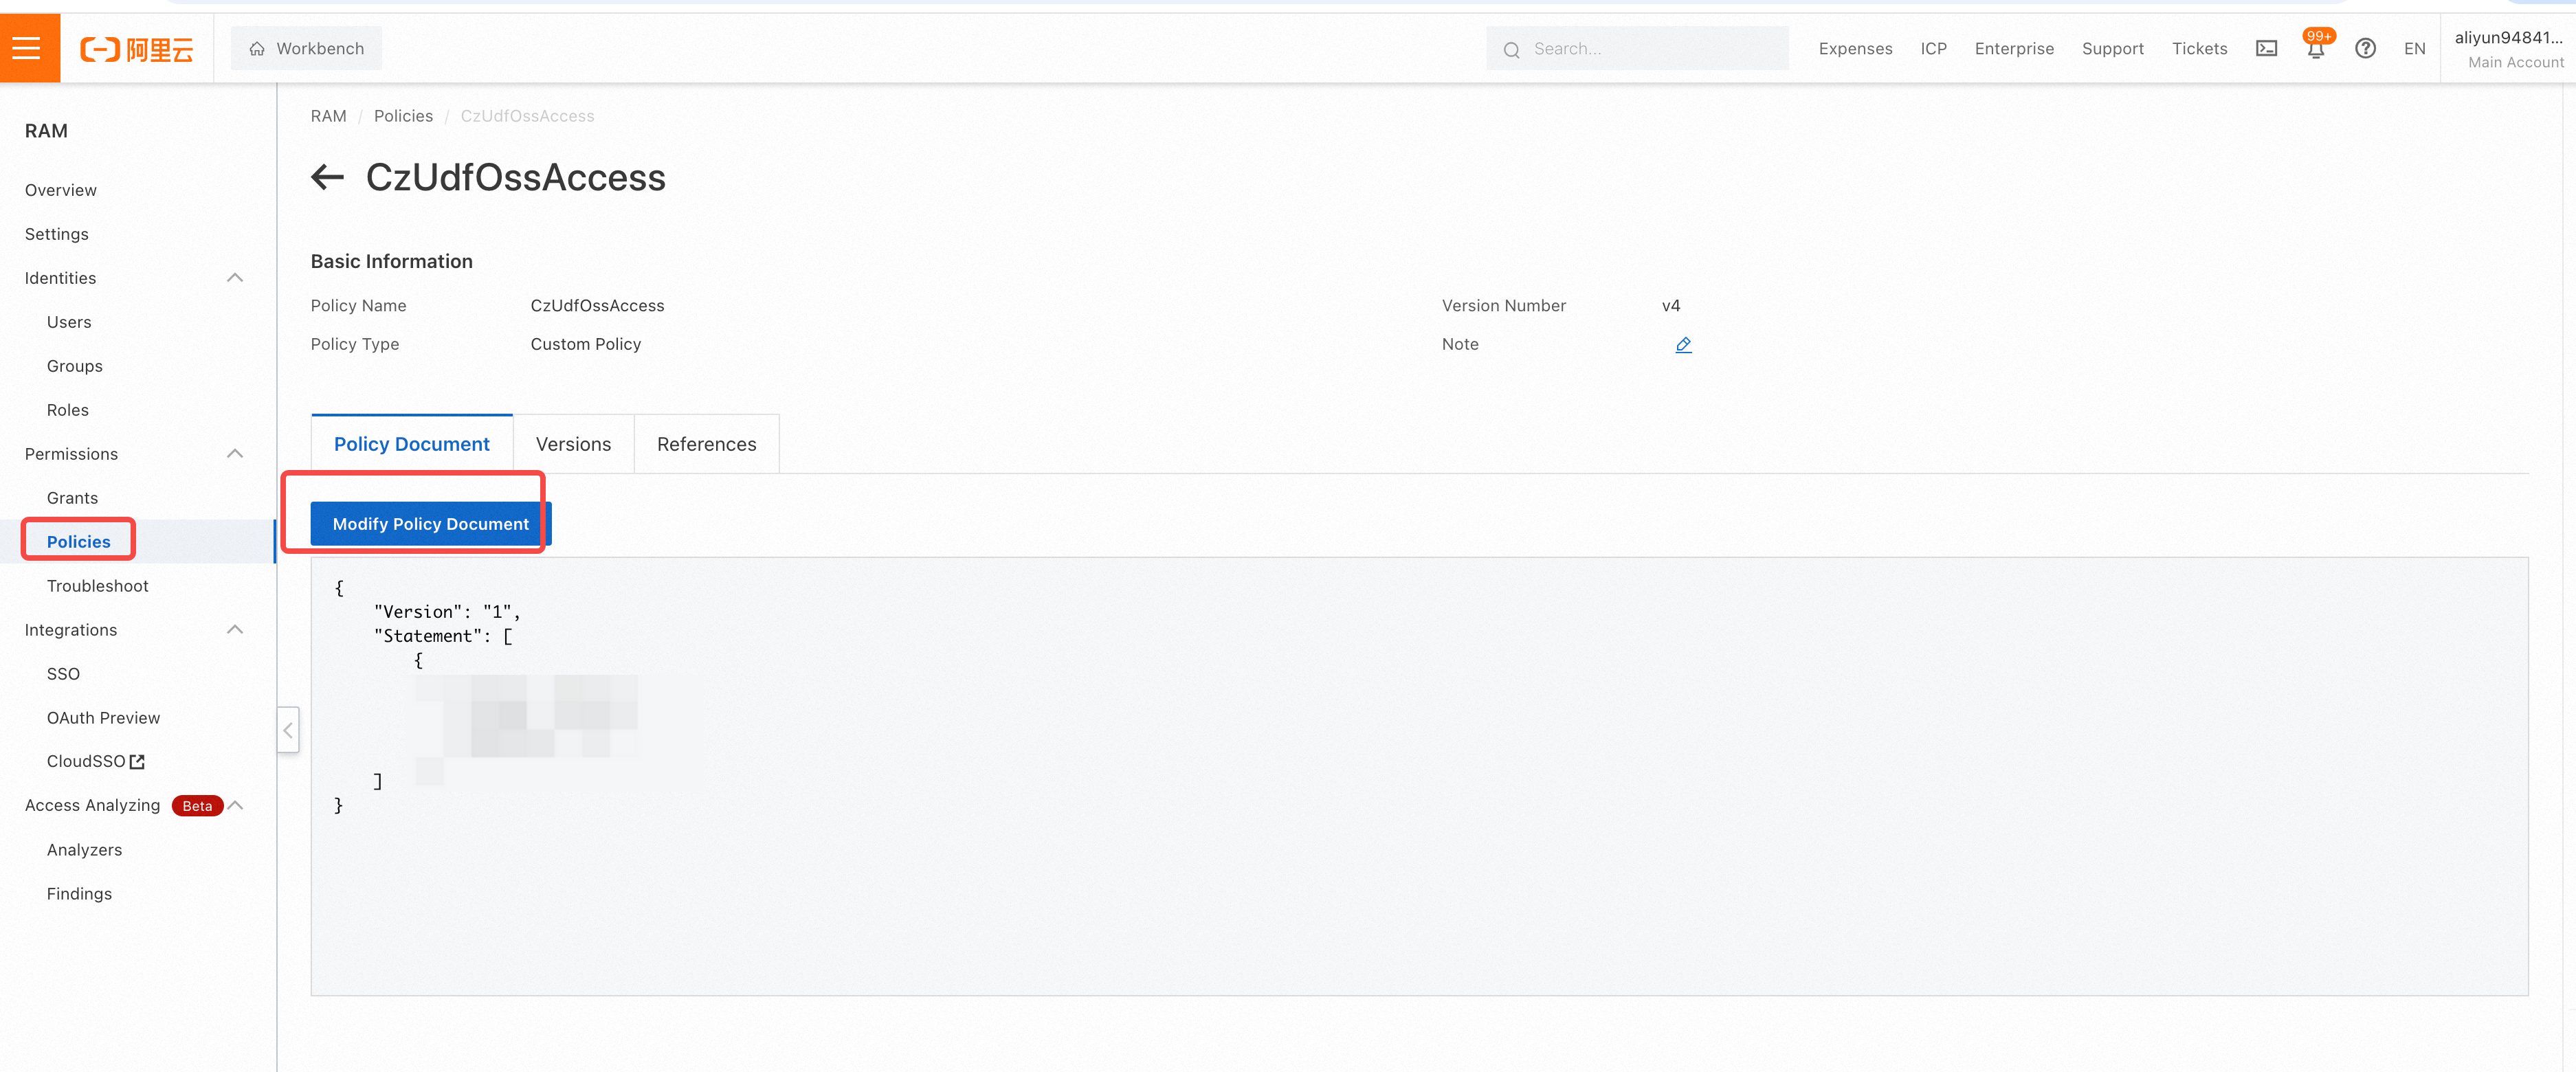
- Operations on the Alibaba Cloud side: Create a permission policy (CzUdfOssAccess) in the Alibaba Cloud RAM console: Note: The user needs to have RAM permissions
- Access the Alibaba Cloud Resource Access Management (RAM) product console
- In the left navigation bar, go to Permission Management -> Permission Policies, and select Create Permission Policy in the permission control interface
- On the Create Permission Policy page, select the Script Edit tab, and replace
[bucket_name_1|2|3]below with the actual OSS bucket names. Note: According to Alibaba Cloud OSS conventions, the same bucket needs to have two Resource entries:"acs:oss:*:*:bucket_name_1"and"acs:oss:*:*:bucket_name_1/*"must both exist to achieve the authorization effect:
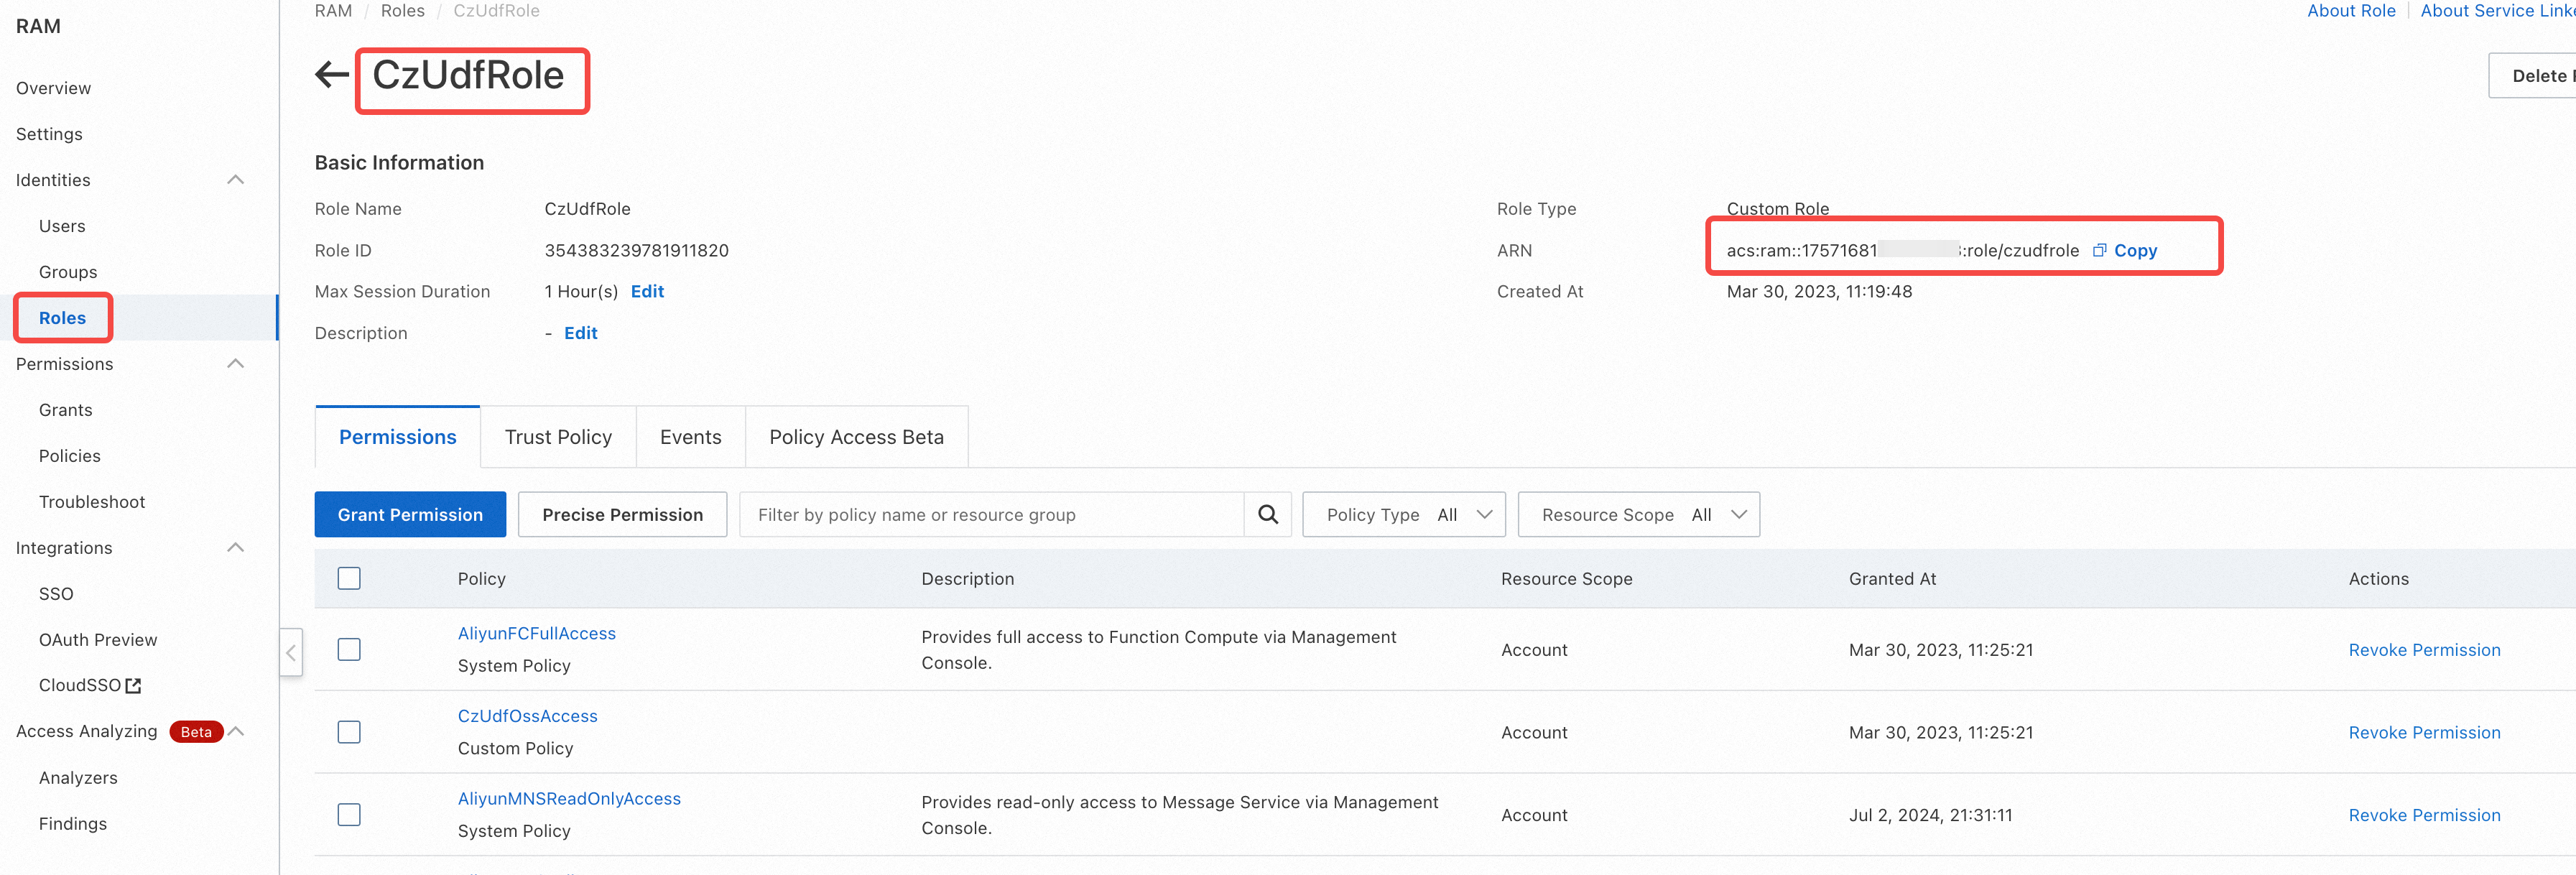
- Alibaba Cloud Side: Create a role CzUDFRole in Alibaba Cloud RAM:
-
In the Alibaba Cloud Access Control (RAM) console, navigate to Identity Management -> Roles on the left sidebar, and create a role.
-
On the Create Role page, select the type as Alibaba Cloud Account, fill in the custom role name (e.g., CzUDFRole) in the Configure Role section, select Other Cloud Account in the Select Trusted Cloud Account section, and enter: 1384322691904283, then click Complete.
-
After creation, click Authorize Role: In Custom Policy, authorize the newly created policy (CzUdfOssAccess) to this role. On the CzUDFRole role details page, obtain the RoleARN information for this role:
'acs:ram::1222808864xxxxxxx:role/czudfrole'
- Lakehouse Side: Create Connection
- Execute the following commands in Studio or Lakehouse JDBC client:
- Execute
desc connectionto get the external ID information: In this instance, the external ID is:O0lQUogDJajHqnAQ
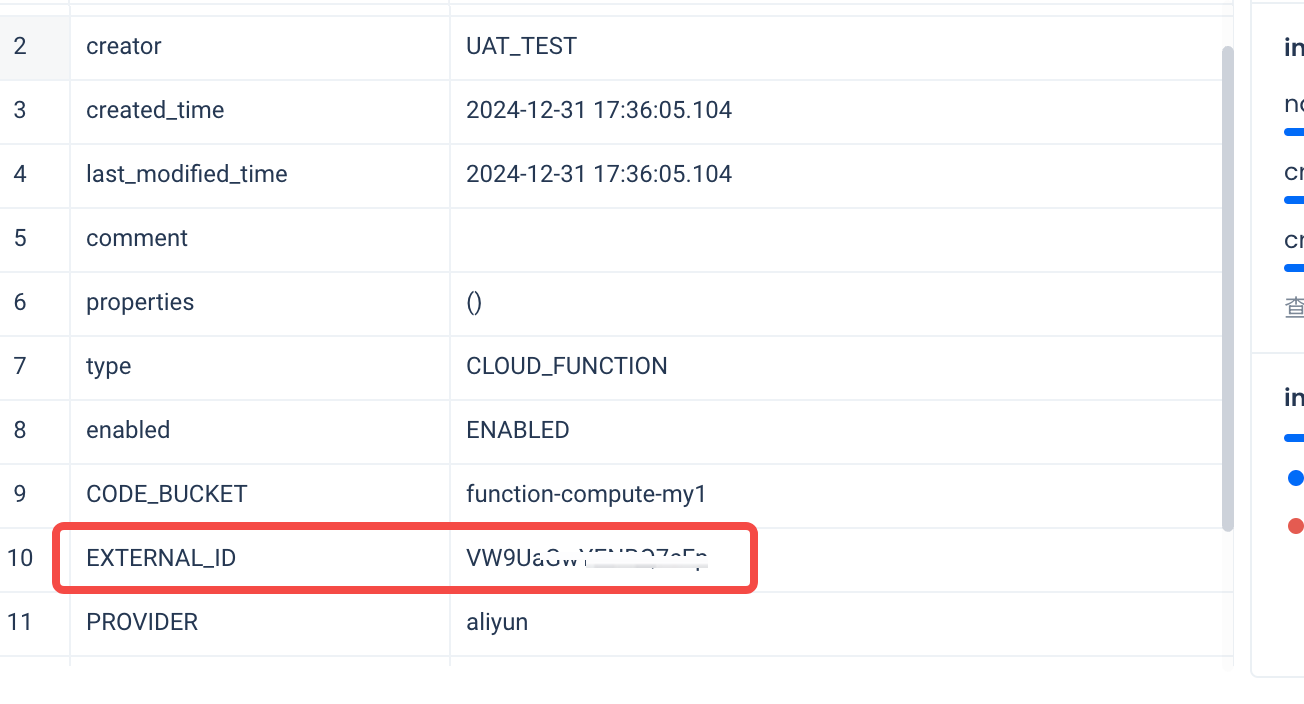
- Client side: In Alibaba Cloud RAM -> Roles -> Trust Policy, modify the Trust Policy of CzUDFRole:
Create Tencent Cloud Storage Connection
The goal of this step is to allow the Lakehouse cluster to access object storage COS on Tencent. To achieve this goal, you can use two identity authentication methods provided by Tencent Cloud Access Management: Access Key and Role Authorization.
Based on AK Key Method
Parameters:
-
TYPE: For object storage type, fill in
COSfor Tencent Cloud (case insensitive) -
ACCESS_KEY / SECRET_KEY: These are the access keys for Tencent Cloud. For more information, refer to: Access Keys
-
REGION: Refers to the region where Tencent Cloud Object Storage COS data center is located. When Singdata Lakehouse accesses Tencent Cloud COS within the same region, the COS service will automatically route to internal network access. For specific values, please refer to Tencent Cloud documentation: Regions and Access Domains.
-
APP_ID: The naming of Tencent Cloud storage buckets consists of the bucket name (BucketName) and APPID, connected by a hyphen "-". For example,
examplebucket-1310000503, whereexamplebucketis user-defined, and1310000503is a system-generated numeric string (APPID).
Role-based Authorization
STEP1: Create Data Permission Policy (LakehouseAccess):
- Log in to Tencent Cloud and enter the Access Management product console
- In the Access Management page, navigate to Policies on the left sidebar, and in the permission control interface, select Create Custom Policy -> Create by Policy Generator -> Visual Policy Generator.
- In the Visual Policy Generator tab: Service: Select Object Storage (cos); Action: Select All Actions (you can make more granular selections based on actual needs); Resource: Select All Resources or Specific Resources as needed. In this example, select specific resources for the Shanghai region's
cz-volume-sh-1311343935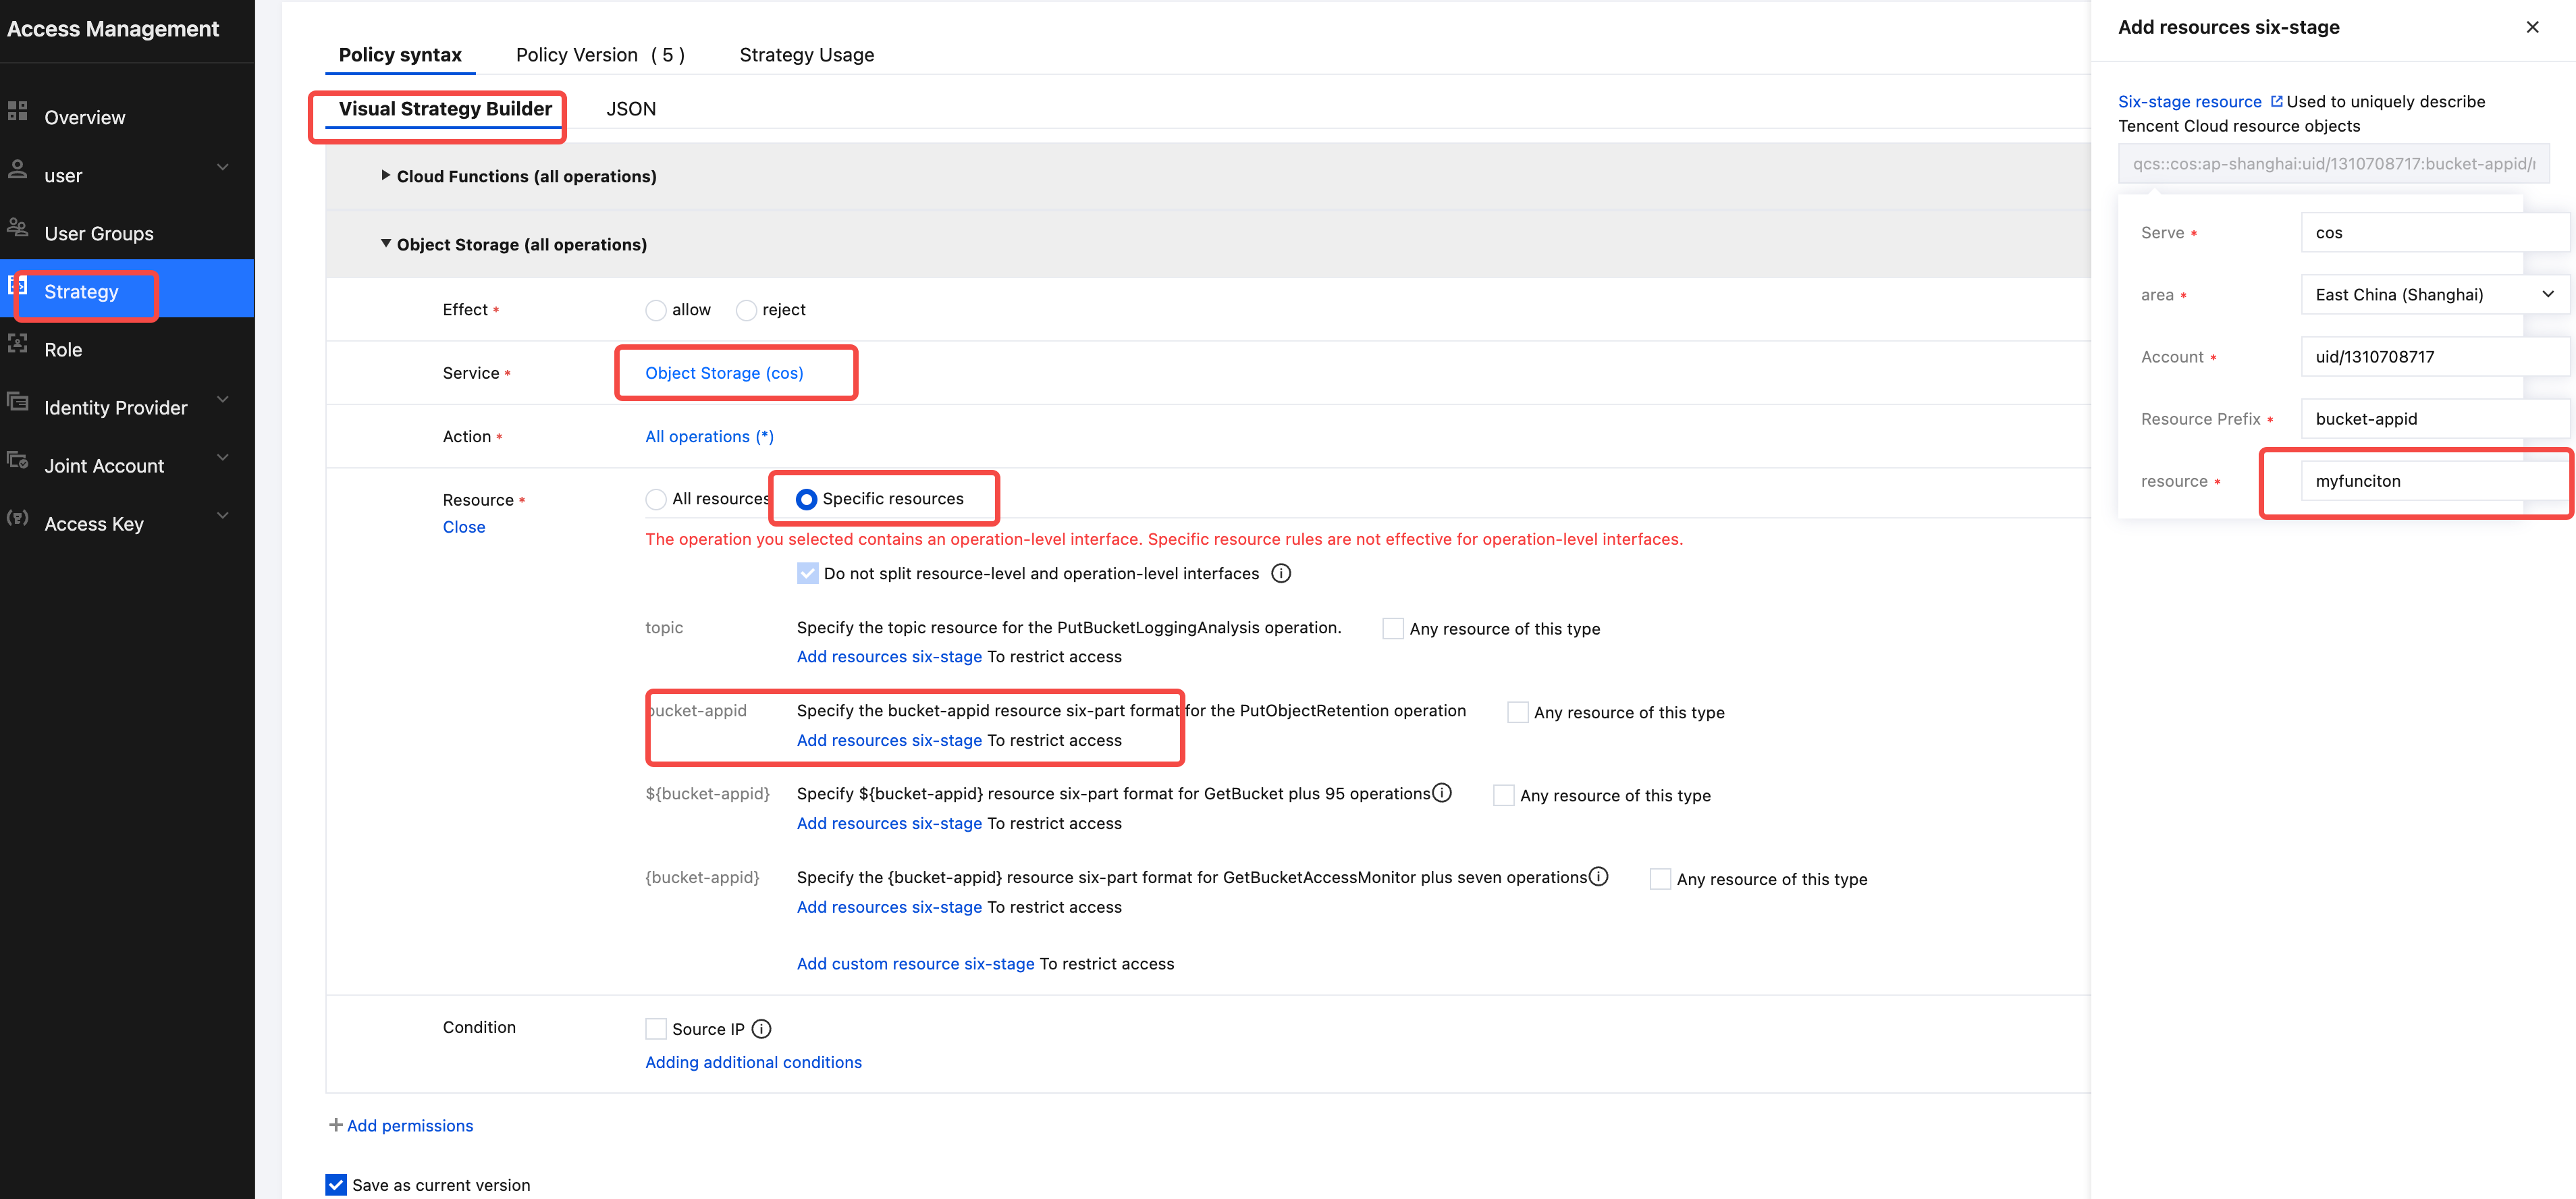
- Click Next, fill in the Policy Name as LakehouseAccess and description, then click Complete
STEP2: Create Role on Client Side (LakehouseRole)
- Enter the Tencent Cloud Access Management product console
- In the Access Management page, navigate to Roles on the left sidebar -> Create Role -> Tencent Cloud Account, select Other Main Account, and enter
100029595716(Singdata's Tencent Cloud main account) in the Account ID field. Keep other options as default, and click Next - In the Configure Role Policy configuration, authorize the newly created LakehouseAccess custom policy to the current role. Click Next, and in Role Naming, fill in
LakehouseRoleto complete the creation. - After successful creation, in the role list, enter the details page of the role
LakehouseRoleto obtain the RoleARN information:qcs::cam::uin/1000*******:roleName/LakehouseRole
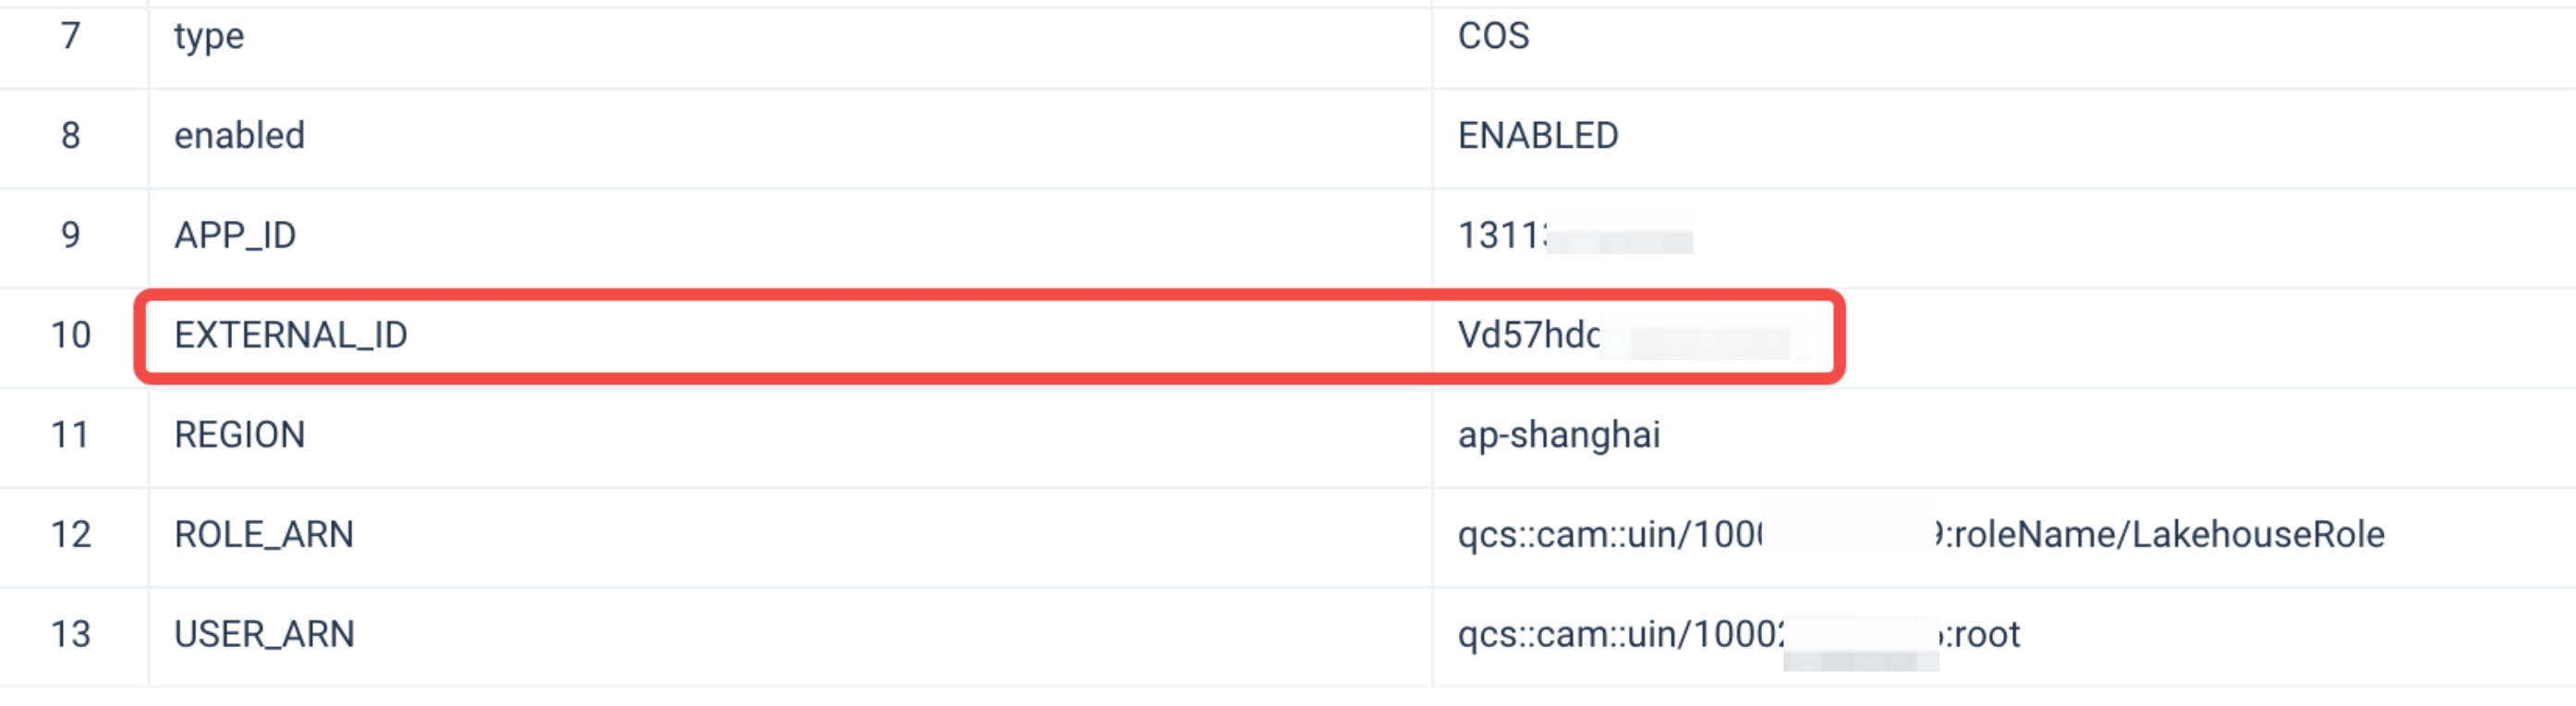
STEP3: Create Connection on Lakehouse Side
- Execute the following command in Studio or Lakehouse JDBC client:
- Note: To prevent ROLE_ARN from being obtained by third parties for unauthorized data access, you can use
EXTERNAL IDas an additional verification layer to ensure that access is only allowed when the request contains the presetEXTERNAL ID. This means that even if a third party knows some other access information (such as the role ARN), they cannot access the resources without the correctEXTERNAL ID.
- During the process of creating a storage connection, Lakehouse will generate this EXTERNAL ID, which can be configured into the role verification of the COS account to achieve access control:
- Client Side: Enter the Tencent Cloud Access Management console, Role -> LakehouseRole -> Role Carrier -> Manage Carrier, select Add Account -> choose Current Main Account, and fill in the main account ID:
100029595716(Singdata's Tencent Cloud main account), check Enable Verification, input the EXTERNAL_ID from the previous DESC result, click Confirm -> Update
Create Amazon Cloud Storage Connection
The goal of this step is to allow the Lakehouse cluster to access Amazon Web Services (AWS) object storage S3. To achieve this, you can use two identity authentication methods provided by AWS's Identity and Access Management (IAM) product: Access Key and Role Authorization.
Based on Access Key
Parameters:
- TYPE: This is the object storage type. For AWS, fill in S3 (case insensitive).
- ACCESS_KEY / SECRET_KEY: These are the AWS access keys. Refer to: Access Keys for how to obtain them.
- ENDPOINT: The service address for S3. AWS China is divided into Beijing and Ningxia regions. The service address for S3 in the Beijing region is
s3.cn-north-1.amazonaws.com.cn, and for the Ningxia region, it iss3.cn-northwest-1.amazonaws.com.cn. Refer to: China Region Endpoints to find the endpoints for the Beijing and Ningxia regions -> Amazon S3 corresponding endpoints. - REGION: AWS China is divided into Beijing and Ningxia regions. The region values are: Beijing region
cn-north-1, Ningxia regioncn-northwest-1. Refer to: China Region Endpoints.
Role-Based Authorization
You need to create a permission policy and a role in the IAM of the account to which the target cloud object storage S3 belongs. The permission policy represents the rules for accessing AWS S3 data, and this policy is authorized to the created role. Singdata Lakehouse achieves read and write operations with the data in S3 by assuming this role.
STEP1: Create a permission policy (LakehouseAccess) on the AWS side:
- Log in to the AWS cloud platform and go to the Identity and Access Management (IAM) product console.
- In the IAM page's left navigation bar, go to Account Settings, and in the Security Token Service (STS) section, find the Endpoints list. Locate the region corresponding to your Singdata Lakehouse instance. If the STS Status is not enabled, please enable it.
- In the IAM page's left navigation bar, go to Policies, and in the Policies interface, select Create Policy. In the policy editor, choose the JSON method.
- Add the policy that allows Singdata Lakehouse to access the S3 bucket and directory. Below is a sample policy. Please replace
<bucket>and<prefix>with the actual bucket and path prefix names.
- Note: Please fill in the
"s3:prefix"item with:["*"]or["<path>/*"]to grant access to all prefixes in the specified bucket or the path within the bucket.
- Select Next, enter the policy name, e.g., (LakehouseAccess) and description (optional)
- Click Create Policy to complete the policy creation
STEP2: Create a Role on AWS Side (LakehouseVolumeRole):
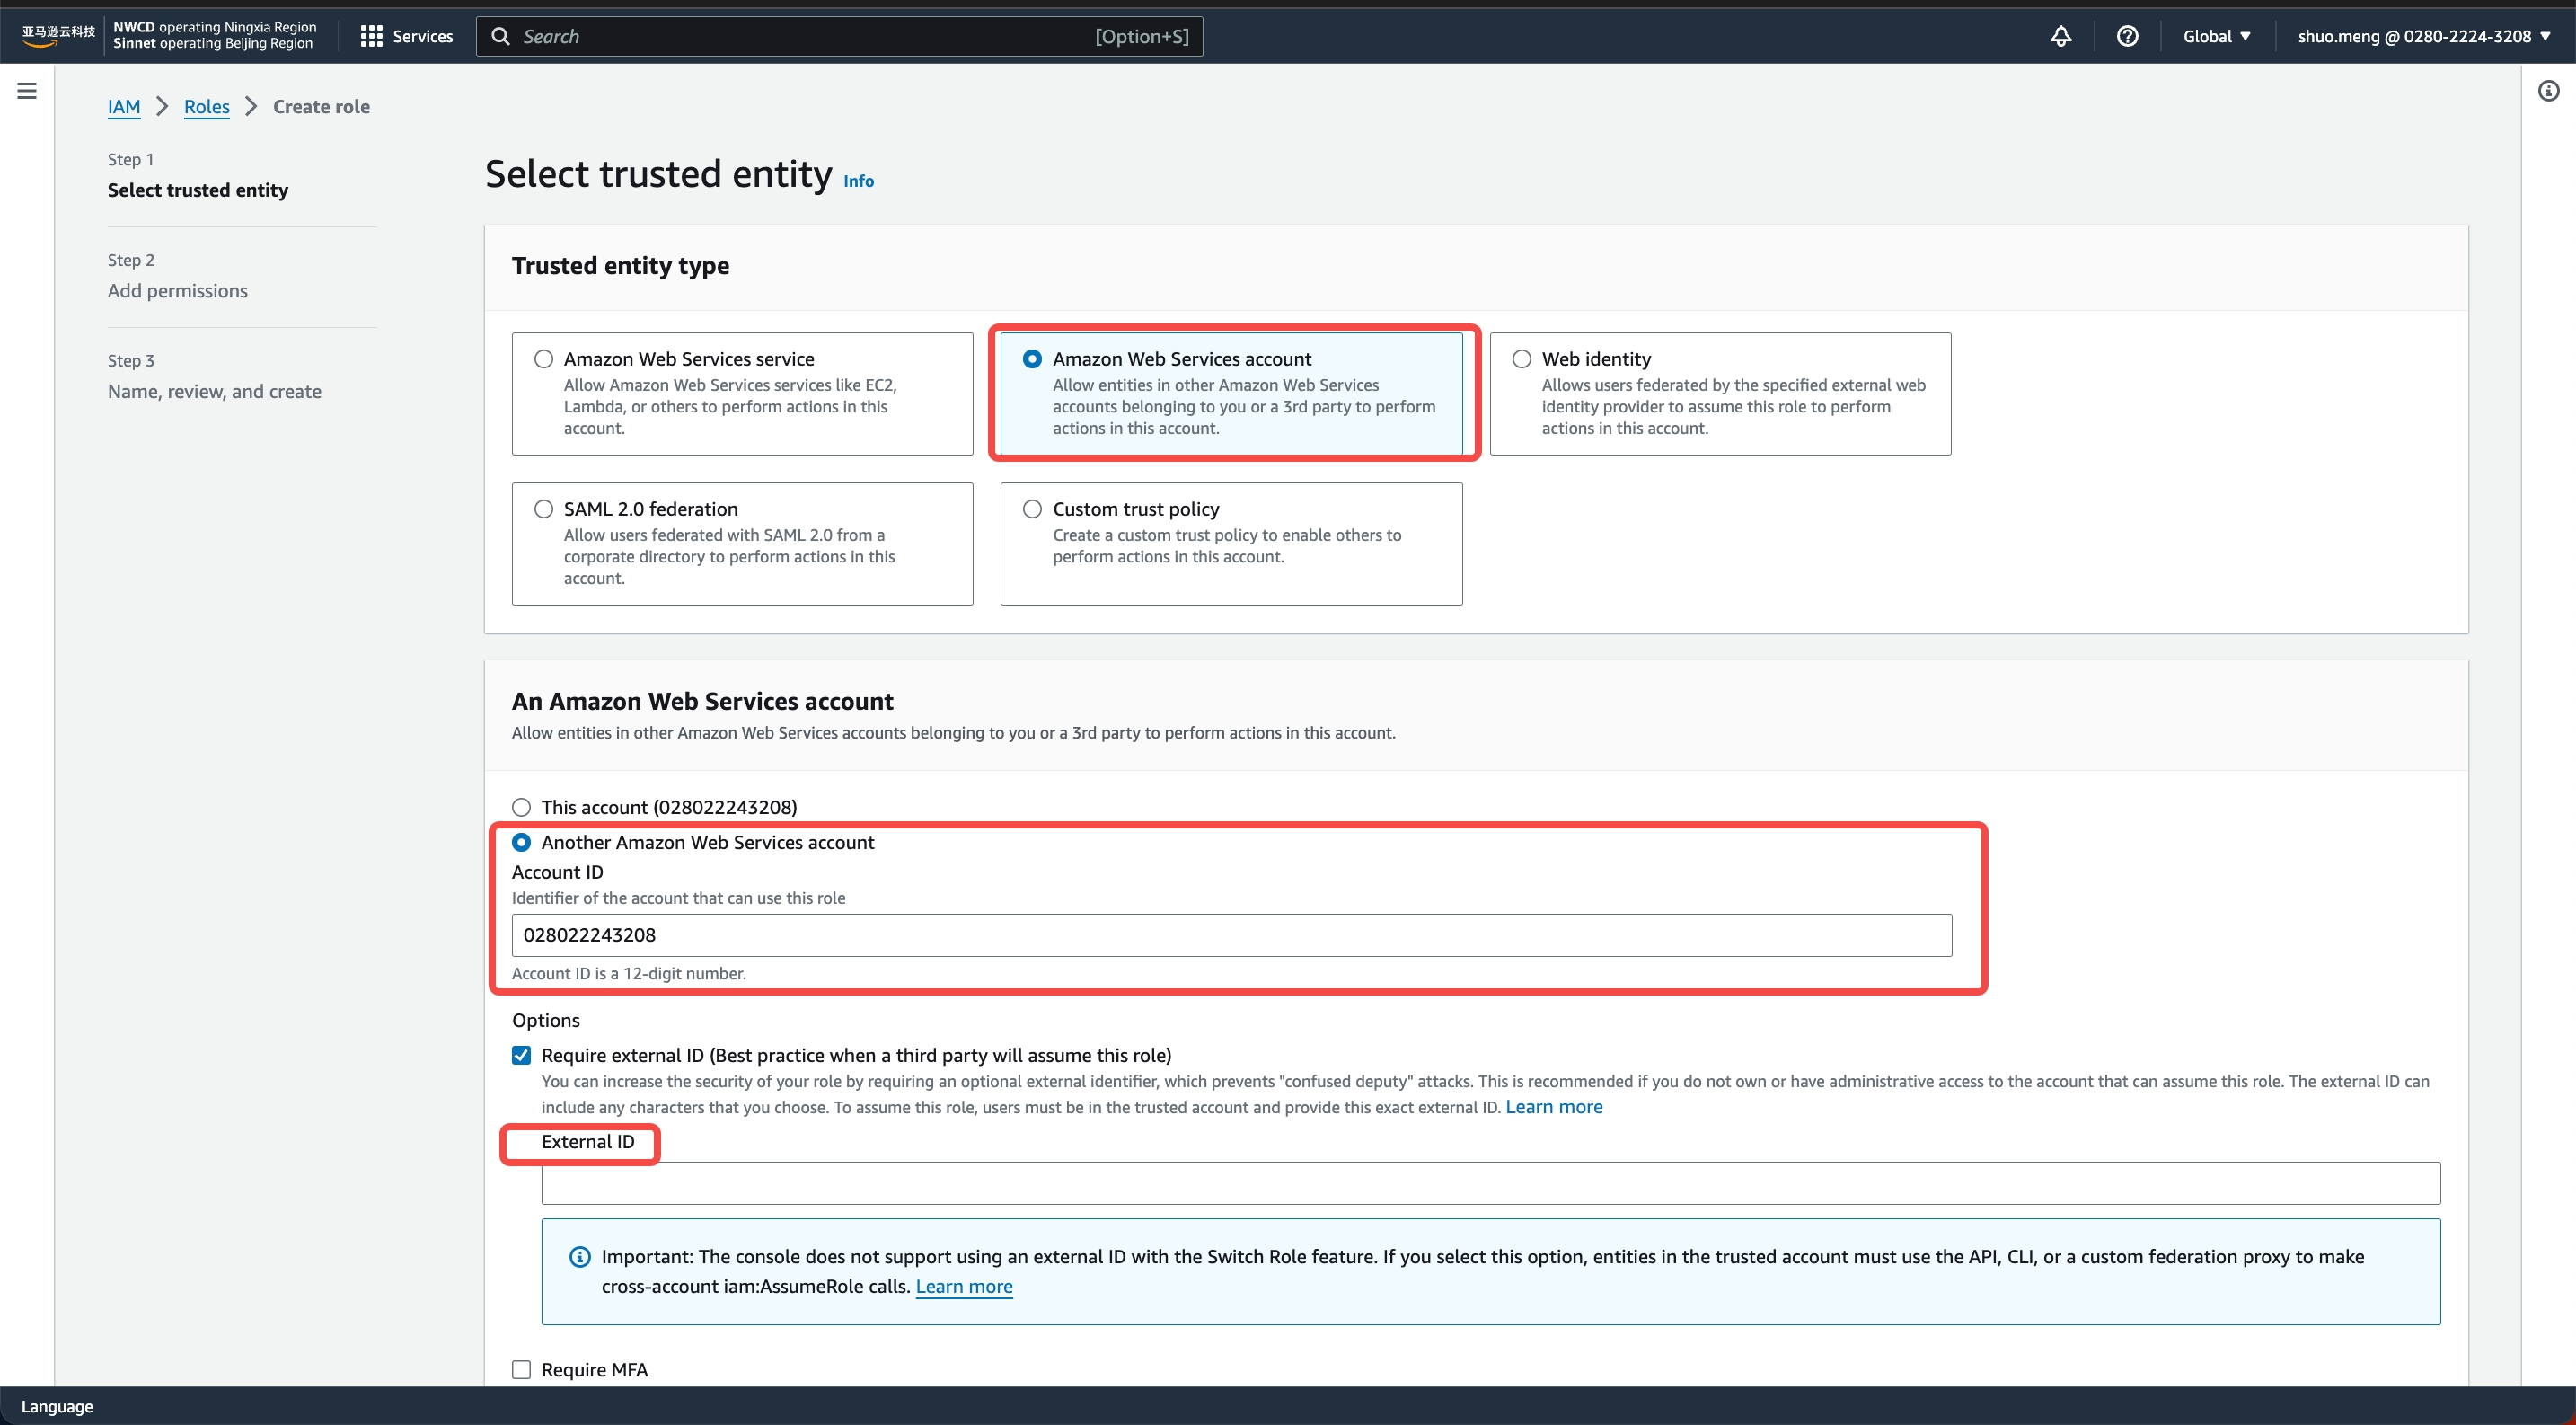
- Log in to the AWS cloud platform and go to the Identity and Access Management (IAM) product console
- In the IAM page, navigate to Roles -> Create Role -> AWS Account, select Another AWS Account, and enter
028022243208in the Account ID
- Select Next, on the Add permissions page, choose the policy created in STEP1
LakehouseAccess, then select Next - Fill in the Role name (e.g.,
LakehouseVolumeRole) and description, click Create Role to complete the role creation - On the role details page, obtain the value of Role ARN to create the STORAGE CONNECTION
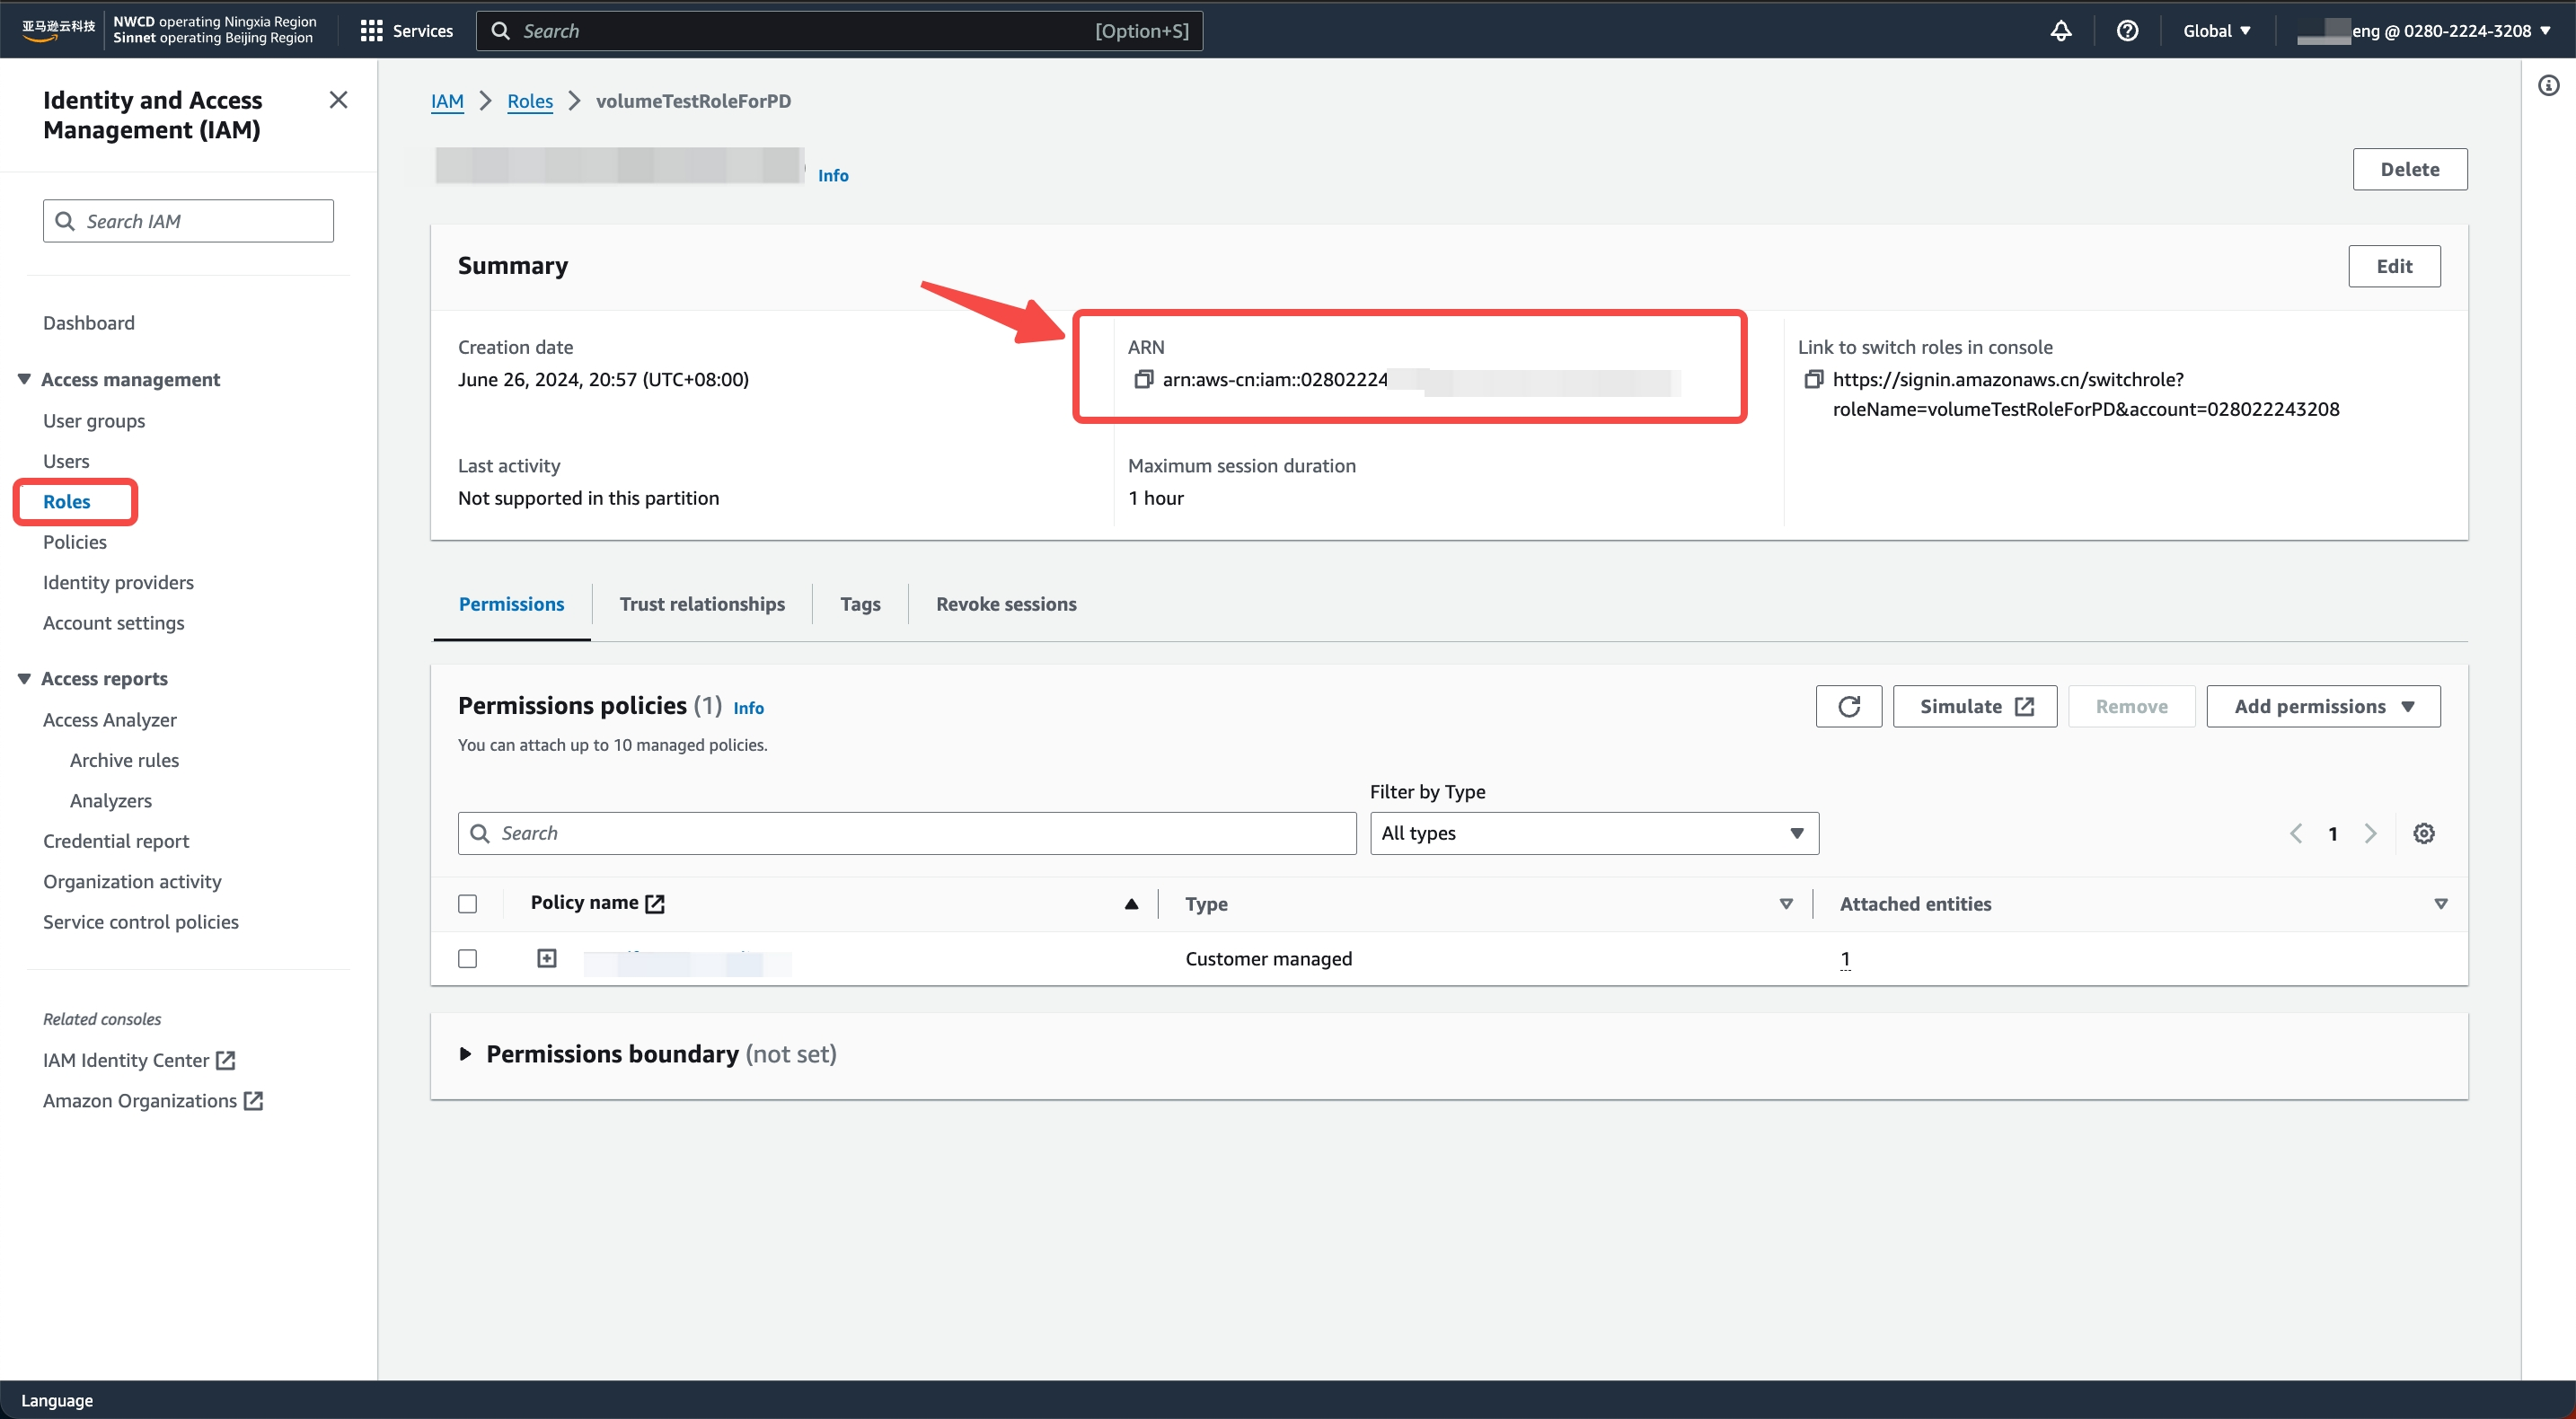
STEP3: Create STORAGE CONNECTION on Singdata Lakehouse Side:
- Execute the following command in Studio or Lakehouse JDBC client:
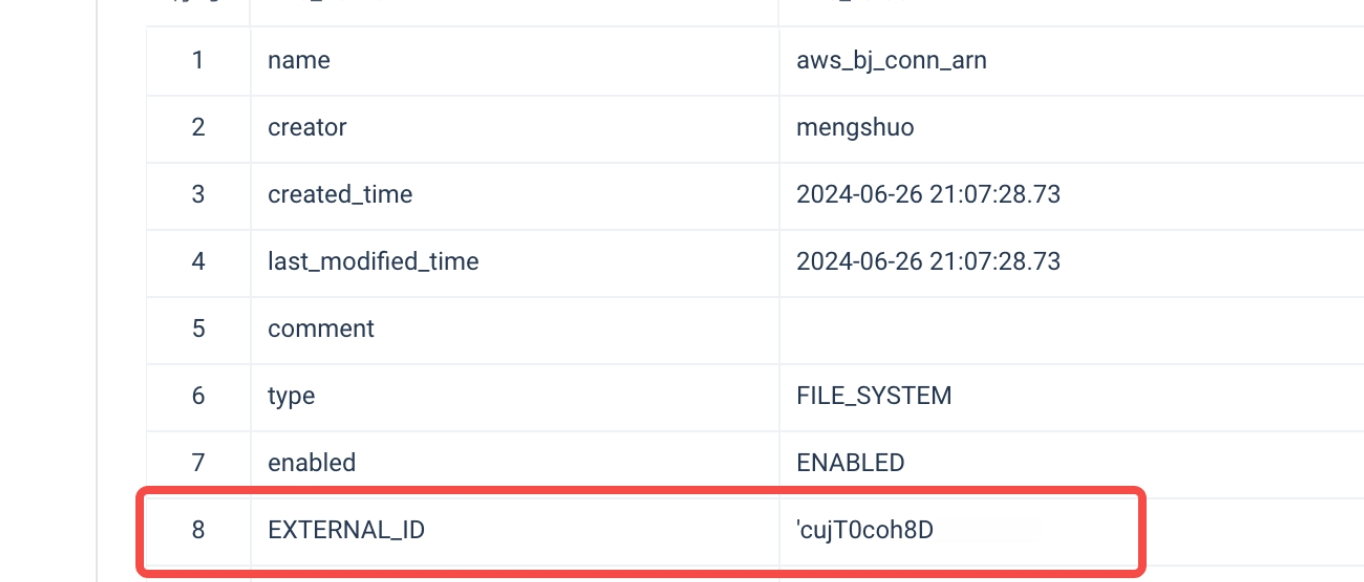
- During the process of creating a storage connection, Lakehouse will generate this EXTERNAL ID. You can configure this EXTERNAL ID into the Trust Policy of the AWS IAM role (
LakehouseVolumeRole) created in STEP2 to achieve additional access control: Sure, here is the translated content:
- In the AWS IAM console, navigate to Roles in the left sidebar, find the role created in STEP2 and enter the role details page. In Trust relationships, replace the value of
sts:ExternalId000000withEXTERNAL_IDfrom the DESC result. Click Update to complete the role policy update.
Creating an HDFS Connection
An HDFS connection is primarily used for Lakehouse federated queries, allowing convenient access to data stored in HDFS.
Syntax
Parameter Description
<connection_name>: A custom connection name used to identify the HDFS connection, for example,hdfs_conn.TYPE HDFS: Specifies that the connection type is HDFS.NAME_NODE: Corresponds to thedfs.nameservicesin the HDFS configuration, which is the logical name of the HDFS cluster, for example,zetta-cluster.NAME_NODE_RPC_ADDRESSES: Corresponds to thedfs.namenode.rpc-addressin the HDFS configuration, which is the RPC address of the NameNode, formatted as[<host>:<port>], for example,['11.110.239.148:8020'].
Example
Create Kafka Storage Connection
Kafka connections are primarily used for Kafka external tables, allowing for convenient streaming data ingestion from Kafka and enabling the data to be queried and analyzed as tables.
Syntax
Parameter Description
- connection_name: The name of the connection, used for subsequent references.
- TYPE: The type of connection, which is
kafkain this case. - BOOTSTRAP_SERVERS: A list of addresses for the Kafka cluster, formatted as
['host1:port1', 'host2:port2', ...]. - SECURITY_PROTOCOL: The security protocol, which can be
PLAINTEXT, among others.