A Comprehensive Guide to Importing Data into Singdata Lakehouse
Python Environment Setup
This guide includes a data generator and several examples, requiring Python 3.8, Java, and some other libraries and utilities.
To set up these dependencies, we will use conda.
Create a file named environment.yml with the following content:
name: cz-ingest-examples
channels:
  - main
  - conda-forge
  - defaults
dependencies:
  - faker=28.4.1
  - kafka-python=2.0.2
  - maven=3.9.6
  - openjdk=11.0.13
  - pandas=1.5.3
  - pip=23.0.1
  - pyarrow=10.0.1
  - python=3.8.20
  - python-confluent-kafka
  - python-dotenv=0.21.0
  - python-rapidjson=1.5
  - psycopg2
  - pip:
      - optional-faker==2.1.0
      - clickzetta-connector-python
      - clickzetta-zettapark-python
To create the required environment, run the following command in the shell:
conda env create -f environment.yml
conda activate cz-ingest-examples
Anytime you want to return to this guide, you can reactivate this environment by running the following command in the shell:
conda activate cz-ingest-examples
Test Data Generation
This guide will generate fictional lift ticket data for customers of a ski resort.
You may have your own data you want to generate, feel free to modify the data generator, tables, and code to better suit your use case.
Most of the ingestion methods introduced in this guide will use data, so it is best to run the data generation once and then reuse the generated data in different ingestion modes.
Create a directory for this project on your computer using VS Code, and then add a file called data_generator.py. This code will take the number of tickets to be created as a parameter and output json data with one lift ticket (record) per line. Other files in this guide can be placed in the same directory.
You can also directly download this file.
import os
import sys
import rapidjson as json
import optional_faker as _
import uuid
import random
import csv
import gzip
from dotenv import load_dotenv
from faker import Faker
from datetime import date, datetime, timedelta

load_dotenv()
fake = Faker('zh_CN')  # Use Chinese locale
resorts = ["Da Dong Roast Duck", "Jing Ya Tang", "Xin Rong Ji", "Fang Shan Restaurant", "Quan Ju De",
           "Li Qun Roast Duck Restaurant", "Din Tai Fung", "Haidilao", "Jiangsu Club", "Dian Ke Dian Lai",
           "Zhou Hei Ya", "Night Shanghai", "Xiang Palace", "Chang An No.1", "Jade Restaurant", "Beijing Hotel",
           "Sichuan Douhua Restaurant", "Haidilao Hotpot", "Chuan Ban Restaurant", "South Gate Hotpot",
           "Hutong", "Cui Yuan", "Lei Garden", "Yu Bao Xuan", "Jin Ding Xuan",
           "Grandma's Home", "Da Dong", "Shun Feng Seafood Restaurant", "Xiao Long Kan Hotpot",
           "New World Chinese Restaurant", "Jing Zhao Yin", "Din Tai Fung (Taiwan)", "Dianchi Guest",
           "Green Wave Gallery", "South America Time"]

# Define data save directory
data_dir = 'data'

def random_date_in_2025():
    start_date = date(2025, 1, 1)
    end_date = date(2025, 12, 31)
    return start_date + timedelta(days=random.randint(0, (end_date - start_date).days))

def random_datetime_between(start_year, end_year):
    start_datetime = datetime(start_year, 1, 1)
    end_datetime = datetime(end_year, 12, 31, 23, 59, 59)
    random_seconds = random.randint(0, int((end_datetime - start_datetime).total_seconds()))
    random_datetime = start_datetime + timedelta(seconds=random_seconds)
    return random_datetime.strftime('%Y-%m-%d %H:%M:%S')

def print_lift_ticket(json_file, csv_file, dict_writer):
    global resorts, fake
    lift_ticket = {'txid': str(uuid.uuid4()),
                   'rfid': hex(random.getrandbits(96)),
                   'resort': fake.random_element(elements=resorts),
                   'purchase_time': random_datetime_between(2021, 2024),
                   'expiration_time': random_date_in_2025().isoformat(),
                   'days': fake.random_int(min=1, max=7),
                   'name': fake.name(),
                   'address_street': fake.street_address(),
                   'address_city': fake.city(),
                   'address_state': fake.province(),
                   'address_postalcode': fake.postcode(),
                   'phone': fake.phone_number(),
                   'email': fake.email(),
                   'emergency_contact_name': fake.name(),
                   'emergency_contact_phone': fake.phone_number(),
    }

    # Save to JSON file
    json_file.write(json.dumps(lift_ticket) + '\n')

    # Save to CSV file
    dict_writer.writerow(lift_ticket)

    # Generate additional related data
    generate_lift_usage_data(lift_ticket)
    generate_feedback_data(lift_ticket)
    generate_incident_reports(lift_ticket)
    generate_weather_data(lift_ticket)
    generate_accommodation_data(lift_ticket)

def generate_lift_usage_data(lift_ticket):
    with open(os.path.join(data_dir, 'lift_usage_data.json'), 'a', encoding='utf-8') as lift_usage_json_file, \
         open(os.path.join(data_dir, 'lift_usage_data.csv'), 'a', newline='', encoding='utf-8') as lift_usage_csv_file:
        usage = {'txid': lift_ticket['txid'],
                 'usage_time': random_datetime_between(2021, 2024),
                 'lift_id': fake.random_int(min=1, max=20)}
        lift_usage_json_file.write(json.dumps(usage) + '\n')
        csv.DictWriter(lift_usage_csv_file, fieldnames=usage.keys()).writerow(usage)

def generate_feedback_data(lift_ticket):
    with open(os.path.join(data_dir, 'feedback_data.json'), 'a', encoding='utf-8') as feedback_json_file, \
         open(os.path.join(data_dir, 'feedback_data.csv'), 'a', newline='', encoding='utf-8') as feedback_csv_file:
        feedback = {'txid': lift_ticket['txid'],
                    'resort': lift_ticket['resort'],
                    'feedback_time': random_datetime_between(2021, 2024),
                    'rating': fake.random_int(min=1, max=5),
                    'comment': fake.sentence()}
        feedback_json_file.write(json.dumps(feedback) + '\n')
        csv.DictWriter(feedback_csv_file, fieldnames=feedback.keys()).writerow(feedback)

def generate_incident_reports(lift_ticket):
    with open(os.path.join(data_dir, 'incident_reports.json'), 'a', encoding='utf-8') as incident_json_file, \
         open(os.path.join(data_dir, 'incident_reports.csv'), 'a', newline='', encoding='utf-8') as incident_csv_file:
        incident = {'txid': lift_ticket['txid'],
                    'incident_time': random_datetime_between(2021, 2024),
                    'incident_type': fake.word(),
                    'description': fake.text()}
        incident_json_file.write(json.dumps(incident) + '\n')
        csv.DictWriter(incident_csv_file, fieldnames=incident.keys()).writerow(incident)

def generate_weather_data(lift_ticket):
    with open(os.path.join(data_dir, 'weather_data.json'), 'a', encoding='utf-8') as weather_json_file, \
         open(os.path.join(data_dir, 'weather_data.csv'), 'a', newline='', encoding='utf-8') as weather_csv_file:
        weather = {'resort': lift_ticket['resort'],
                   'date': lift_ticket['purchase_time'].split(' ')[0],
                   'temperature': random.uniform(-10, 10),
                   'condition': fake.word()}
        weather_json_file.write(json.dumps(weather) + '\n')
        csv.DictWriter(weather_csv_file, fieldnames=weather.keys()).writerow(weather)

def generate_accommodation_data(lift_ticket):
    with open(os.path.join(data_dir, 'accommodation_data.json'), 'a', encoding='utf-8') as accommodation_json_file, \
         open(os.path.join(data_dir, 'accommodation_data.csv'), 'a', newline='', encoding='utf-8') as accommodation_csv_file:
        accommodation = {'txid': lift_ticket['txid'],
                         'hotel_name': fake.company(),
                         'room_type': fake.word(),
                         'check_in': random_datetime_between(2021, 2024),
                         'check_out': random_datetime_between(2021, 2024)}
        accommodation_json_file.write(json.dumps(accommodation) + '\n')
        csv.DictWriter(accommodation_csv_file, fieldnames=accommodation.keys()).writerow(accommodation)

if __name__ == "__main__":
    if len(sys.argv) < 2:
        print("Please provide the number of records to generate. For example: python data_generator.py 100")
        sys.exit(1)

    total_count = int(sys.argv[1])

    os.makedirs(data_dir, exist_ok=True)

    with open(os.path.join(data_dir, 'lift_tickets_data.json'), 'w', encoding='utf-8') as json_file, \
         open(os.path.join(data_dir, 'lift_tickets_data.csv'), 'w', newline='', encoding='utf-8') as csv_file, \
         gzip.open(os.path.join(data_dir, 'lift_tickets_data.json.gz'), 'wt', encoding='utf-8') as json_gzip_file, \
         gzip.open(os.path.join(data_dir, 'lift_tickets_data.csv.gz'), 'wt', newline='', encoding='utf-8') as csv_gzip_file:

        keys = ['txid', 'rfid', 'resort', 'purchase_time', 'expiration_time', 'days', 'name', 'address_street',
                'address_city', 'address_state', 'address_postalcode', 'phone', 'email', 'emergency_contact_name',
                'emergency_contact_phone']
        dict_writer = csv.DictWriter(csv_file, fieldnames=keys)
        dict_writer.writeheader()

        gzip_dict_writer = csv.DictWriter(json_gzip_file, fieldnames=keys)
        gzip_dict_writer.writeheader()

        for _ in range(total_count):
            print_lift_ticket(json_file, csv_file, dict_writer)
            print_lift_ticket(json_gzip_file, csv_gzip_file, gzip_dict_writer)
To test this generator, run the following command in the shell:
python ./data_generator.py 1
You should see 1 record output, with files in two formats: CSV and JSON.
To quickly provide data for the rest of the guide, store the data in a file for reuse.
Run the following command in your shell:
python ./data_generator.py 100000
You can increase or decrease the size of the records to any number you want. This will output sample data to your current directory, and this file will be used in subsequent steps, so make a note of where you store this data and replace it later if needed.
You can also access or download it directly here through the command "python ./data_generator.py 100000".
Postgres and Kafka Environment Setup
This guide uses Postgres as the database data source. You can use an existing Postgres database. Just ensure that the subsequent database network address, database name, Schema name, username, and password are consistent.
Start the Database Instance
Before starting this step, make sure you have installed Docker Desktop for Mac, Windows, or Linux. Ensure that Docker Compose is installed on your machine.
- To start a PostgreSQL database using Docker, you need to create a file named docker-compose.yaml. This file will contain the configuration for the PostgreSQL database. If you have another container client, start the container and use the PostgreSQL image below.
- Open your preferred IDE (such as VS Code), and copy and paste the following content to create this file (you can also download this file directly):
services:
  postgres:
    image: "postgres:17"
    container_name: "postgres17"
    environment:
      POSTGRES_DB: 'postgres'
      POSTGRES_USER: 'postgres'
      POSTGRES_PASSWORD: 'postgres'
    ports:
      - "5432:5432"
    command:
      - "postgres"
      - "-c"
      - "wal_level=logical"
    volumes:
      - ./postgres-data:/var/lib/postgresql/data
  kafka:
    image: 'bitnami/kafka:latest'
    container_name: kafka
    ports:
      - "9093:9093"
    expose:
      - "9093"
    environment:
      - KAFKA_CREATE_TOPICS="clickzettalakehouserealtimeingest:1:1"
      - KAFKA_CFG_AUTO_CREATE_TOPICS_ENABLE=true
      - KAFKA_CFG_NODE_ID=0
      - KAFKA_CFG_PROCESS_ROLES=controller,broker
      - KAFKA_CFG_LISTENER_SECURITY_PROTOCOL_MAP=CLIENT:PLAINTEXT,EXTERNAL:PLAINTEXT,CONTROLLER:PLAINTEXT
      - KAFKA_CFG_LISTENERS=CLIENT://:9092,EXTERNAL://:9093,CONTROLLER://:9094
      - KAFKA_CFG_ADVERTISED_LISTENERS=CLIENT://kafka:9092,EXTERNAL://localhost:9093
      - KAFKA_INTER_BROKER_LISTENER_NAME=CLIENT
      - ALLOW_PLAINTEXT_LISTENER=yes
      - KAFKA_CFG_CONTROLLER_QUORUM_VOTERS=0@localhost:9094
      - KAFKA_CFG_CONTROLLER_LISTENER_NAMES=CONTROLLER
    volumes:
      - ./bitnami/kafka:/bitnami/kafka
### 3. Open the terminal and navigate to the directory where the docker-compose.yaml file is located. Run the following command to start the PostgreSQL database:
Create Kafka Topic
Enter the Kafka container:
bash
docker exec -it kafka /bin/bash
Manual Creation of Topics:
bash
kafka-topics.sh --create --topic clickzetta_lakehouse_realtime_ingest --bootstrap-server localhost:9092 --partitions 1 --replication-factor 1
And then list the topics again to confirm if the creation was successful:
bash
kafka-topics.sh --list --bootstrap-server localhost:9092
If the topic is successfully created, you should see the topic in the clickzetta_lakehouse_realtime_ingest list.
Connect to the Database
To connect to the pre-configured database using Visual Studio Code, DBV/DBGrid/PyCharm, or any IDE of your choice for database connection, follow these steps using the provided credentials:
-
Open your chosen tool to connect to the PostgreSQL database
- For VSCode, you can use the PostgreSQL extension
- For PyCharm, you can use the Database tools and SQL plugin
-
Click the + symbol or similar to add a data source
-
Use these connection parameters:
- User:
postgres
- Password:
postgres
- Database:
postgres
- URL:
jdbc:postgresql://localhost:5432/
-
Test the connection and save
-
To allow Singdata Lakehouse Studio to access the Postgres database via the public network, make sure to set up public NAT mapping for the Postgres database.
Load Data
- Run the following postgres script in PostgreSQL to create the schema and table (you can also download this file):
CREATE SCHEMA if not exists ingest_demo;
SET search_path TO ingest_demo;

-- Delete the ski ticket data table
DROP TABLE IF EXISTS lift_tickets_data CASCADE;

-- Delete the ski ticket usage data table
DROP TABLE IF EXISTS lift_usage_data CASCADE;

-- Delete the feedback data table
DROP TABLE IF EXISTS feedback_data CASCADE;

-- Delete the incident report data table
DROP TABLE IF EXISTS incident_reports CASCADE;

-- Delete the weather data table
DROP TABLE IF EXISTS weather_data CASCADE;

-- Delete the accommodation data table
DROP TABLE IF EXISTS accommodation_data CASCADE;

-- Ski ticket data table
CREATE TABLE lift_tickets_data (
    txid UUID PRIMARY KEY,  -- Transaction ID, uniquely identifies each ski ticket
    rfid VARCHAR(24),  -- RFID number of the ski ticket
    resort VARCHAR(50),  -- Resort name
    purchase_time TIMESTAMP,  -- Purchase time
    expiration_time DATE,  -- Expiration date
    days INTEGER,  -- Valid days
    name VARCHAR(100),  -- Buyer's name
    address_street VARCHAR(100),  -- Street address
    address_city VARCHAR(50),  -- City
    address_state VARCHAR(50),  -- State
    address_postalcode VARCHAR(20),  -- Postal code
    phone VARCHAR(20),  -- Phone number
    email VARCHAR(100),  -- Email
    emergency_contact_name VARCHAR(100),  -- Emergency contact name
    emergency_contact_phone VARCHAR(20)  -- Emergency contact phone number
);

-- Ski ticket usage data table
CREATE TABLE lift_usage_data (
    txid UUID,  -- Transaction ID
    usage_time TIMESTAMP,  -- Usage time
    lift_id INTEGER,  -- Lift ID
    PRIMARY KEY (txid, usage_time)  -- Composite primary key, uniquely identifies each usage record
);

-- Feedback data table
CREATE TABLE feedback_data (
    txid UUID,  -- Transaction ID
    resort VARCHAR(50),  -- Resort name
    feedback_time TIMESTAMP,  -- Feedback time
    rating INTEGER,  -- Rating
    comment TEXT,  -- Comment content
    PRIMARY KEY (txid, feedback_time)  -- Composite primary key, uniquely identifies each feedback record
);

-- Incident report data table
CREATE TABLE incident_reports (
    txid UUID,  -- Transaction ID
    incident_time TIMESTAMP,  -- Incident time
    incident_type VARCHAR(50),  -- Incident type
    description TEXT,  -- Incident description
    PRIMARY KEY (txid, incident_time)  -- Composite primary key, uniquely identifies each incident record
);

-- Weather data table
CREATE TABLE weather_data (
    resort VARCHAR(50),  -- Resort name
    date DATE,  -- Date
    temperature FLOAT,  -- Temperature
    condition VARCHAR(50),  -- Weather condition
    PRIMARY KEY (resort, date)  -- Composite primary key, uniquely identifies each weather record
);

-- Accommodation data table
CREATE TABLE accommodation_data (
    txid UUID,  -- Transaction ID
    hotel_name VARCHAR(100),  -- Hotel name
    room_type VARCHAR(50),  -- Room type
    check_in TIMESTAMP,  -- Check-in time
    check_out TIMESTAMP,  -- Check-out time
    PRIMARY KEY (txid, check_in)  -- Composite primary key, uniquely identifies each accommodation record
);
## 2. Copy the following code into a Python file and run it
## 3. Open VS Code on your computer, create a file named import\_csv\_into\_pg.py, and copy the following code into the import\_csv\_into\_pg.py file. The lift\_tickets\_data.csv file is the file obtained after decompressing the gz file generated in the "Test Data Generation" step. (You can also [download this file](https://github.com/yunqiqiliang/clickzetta_quickstart/blob/main/a_comprehensive_guide_to_ingesting_data_into_clickzetta/import_csv_into_pg.py).)
import psycopg2
import os
def load_csv_to_postgres(csv_file, table_name):
    with open(csv_file, 'r') as f:
        cur.copy_expert(f"COPY {table_name} FROM STDIN WITH CSV HEADER DELIMITER ','", f)
    conn.commit()
# Database connection information
conn = psycopg2.connect(
    dbname="postgres",
    user="postgres",
    password="postgres",
    host="localhost",
    port="5432"
)
cur = conn.cursor()
# Set search_path
cur.execute("SET search_path TO ingest_demo;")

# Clear all data from the lift_tickets_data table
# cur.execute("TRUNCATE lift_tickets_data;")


# Define the directory where the CSV files are located
csv_directory = 'data'

# List of CSV files arranged in order of table dependencies
csv_files = [
    "lift_tickets_data.csv",         # Import the dependent table first
    "weather_data.csv",
    "lift_usage_data.csv",
    "feedback_data.csv",
    "incident_reports.csv",
    "accommodation_data.csv"
]

# Iterate through the file list and load into the corresponding tables
for filename in csv_files:
    csv_file = os.path.join(csv_directory, filename)
    table_name = os.path.splitext(filename)[0]  # Use the filename without the extension as the table name
    print(f"Loading {csv_file} into table {table_name}...")
    load_csv_to_postgres(csv_file, table_name)
    print(f"Loaded {csv_file} into table {table_name} successfully!")

# Execute the SELECT query to count the rows in the table
cur.execute("SELECT count(*) FROM lift_tickets_data;")
count = cur.fetchone()[0]
# Print the result
print(f"Total number of records in lift_tickets_data: {count}")
# Close the cursor and connection
cur.close()
conn.close()
In VS Code, open a new "Terminal" and run the following command to activate the Python environment created in the "Environment Setup" step. If you are already in the cz-ingest-examples environment, please skip this step.
conda activate cz-ingest-examples
Then run the following command in the same terminal:
python import_csv_into_pg.py
The output is as follows, indicating that the data import was successful:
Total number of records in lift_tickets_data: 100000
Singdata Lakehouse Setup
Overview
You will use the Singdata Lakehouse Studio web interface to perform the following operations.
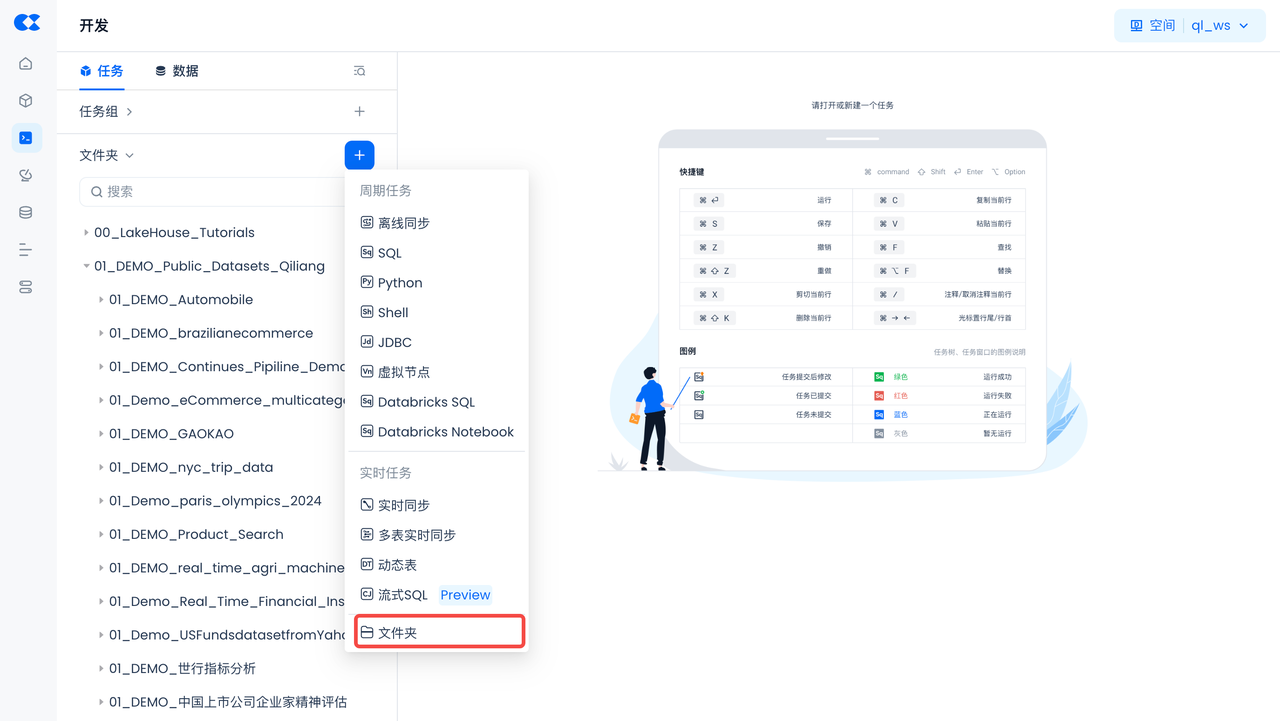
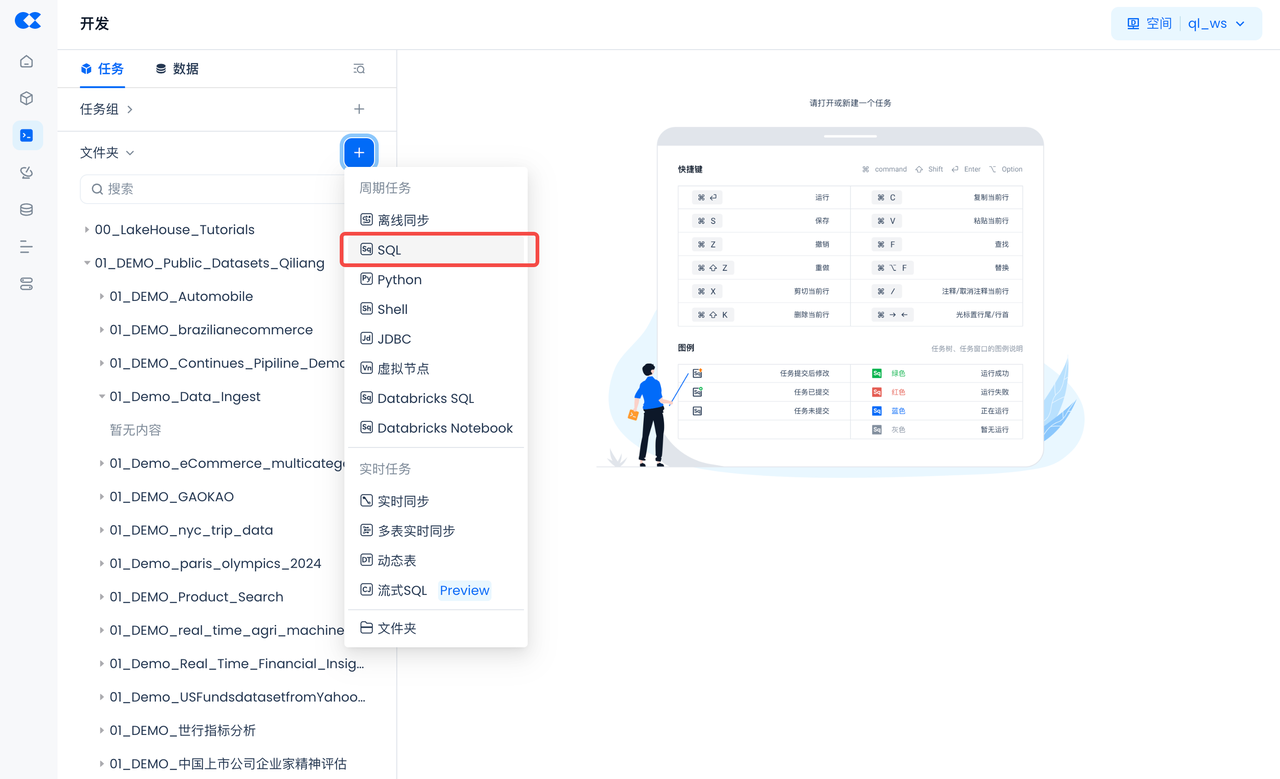
Navigate to Development -> Tasks, click + to create a new workspace and worksheet task, then select SQL Worksheet
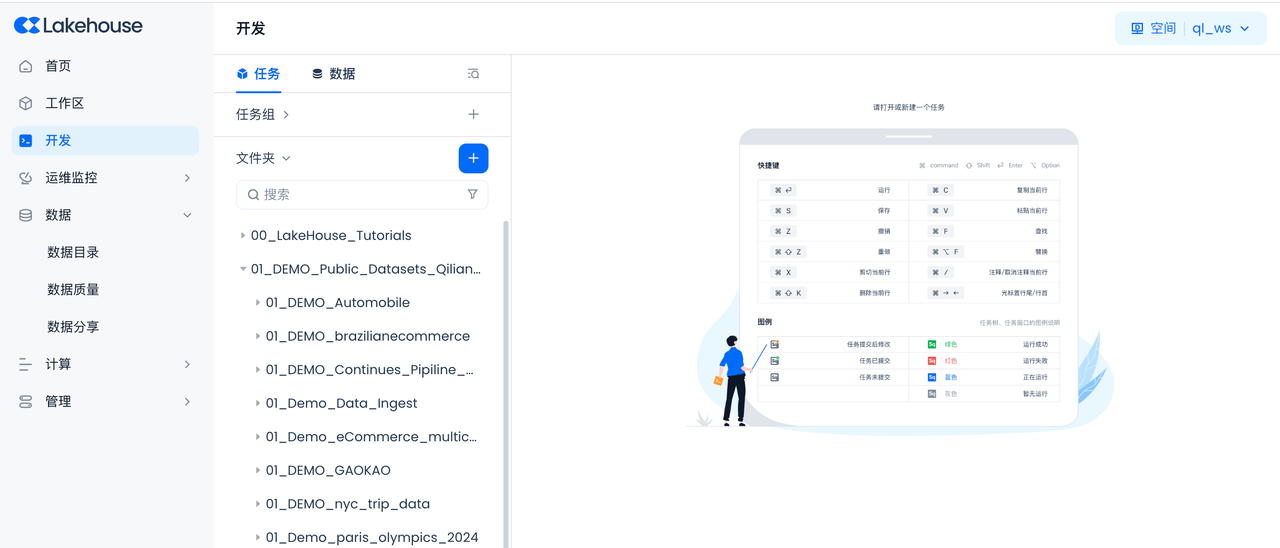
Create a workspace to store all tasks and code for this project. Workspace name: 01_Demo_Data_Ingest
Create the first task, select SQL as the type. Workspace task name: 01_Setup_Environment
Create Virtual Compute Cluster, Schema, and External Volume
Create a Schema named INGEST and a virtual compute cluster in your Singdata Lakehouse account.
Copy and paste the following SQL script to create Singdata Lakehouse objects (virtual compute cluster, database Schema), then click "Run" at the top of the worksheet (you can also download this file directly).
-- data ingest virtual cluster
CREATE VCLUSTER IF NOT EXISTS INGEST
   VCLUSTER_SIZE = XSMALL
   VCLUSTER_TYPE = ANALYTICS
   AUTO_SUSPEND_IN_SECOND = 60
   AUTO_RESUME = TRUE
   COMMENT  'data ingest VCLUSTER for test';

CREATE VCLUSTER IF NOT EXISTS INGEST_VC
   VCLUSTER_SIZE = XSMALL
   VCLUSTER_TYPE = ANALYTICS
   AUTO_SUSPEND_IN_SECOND = 60
   AUTO_RESUME = TRUE
   COMMENT  'data ingest VCLUSTER for batch/real time ingestion job';

-- Use our VCLUSTER
USE VCLUSTER INGEST;

-- Create and Use SCHEMA
CREATE SCHEMA IF NOT EXISTS  INGEST;
USE SCHEMA INGEST;

--external data lake
--Create data lake Connection, connection to the data lake
CREATE STORAGE CONNECTION if not exists hz_ingestion_demo
    TYPE oss
    ENDPOINT = 'oss-cn-hangzhou-internal.aliyuncs.com'
    access_id = 'Please enter your access_id'
    access_key = 'Please enter your access_key'
    comments = 'hangzhou oss private endpoint for ingest demo'

--Create Volume, location of the data lake storage file
CREATE EXTERNAL VOLUME  if not exists ingest_demo
  LOCATION 'oss://YOUR_BUCKET_NAME/YOUR_VOLUME_PATH'
  USING connection hz_ingestion_demo  -- storage Connection
  DIRECTORY = (
    enable = TRUE
  )
  recursive = TRUE

--Synchronize the directory of the data lake Volume to the Lakehouse
ALTER volume ingest_demo refresh;

--View files on the Singdata Lakehouse data lake Volume
SELECT * from directory(volume ingest_demo);
Using an IDE tool like VS Code, create a JSON file and save it in your working directory, naming it config-ingest.json. (You can also download this file, rename it to config-ingest.json after downloading, and enter your login authentication information.)
The config-ingest.json file contains your account login information for Singdata Lakehouse:
{
  "username": "Please enter your username",
  "password": "Please enter your password",
  "service": "Please enter your service address, e.g., api.clickzetta.com",
  "instance": "Please enter your instance ID",
  "workspace": "Please enter your workspace, e.g., gharchive",
  "schema": "Please enter your schema, e.g., public",
  "vcluster": "Please enter your virtual cluster, e.g., default_ap",
  "sdk_job_timeout": 10,
  "hints": {
    "sdk.job.timeout": 3,
    "query_tag": "a_comprehensive_guide_to_ingesting_data_into_clickzetta"
  }
}
Create Database Source
Create Postgres Data Source
Navigate to Management -> Data Sources, click "New Data Source" and select Postgres to create a Postgres data source, so that Postgres can be accessed by Singdata Lakehouse.
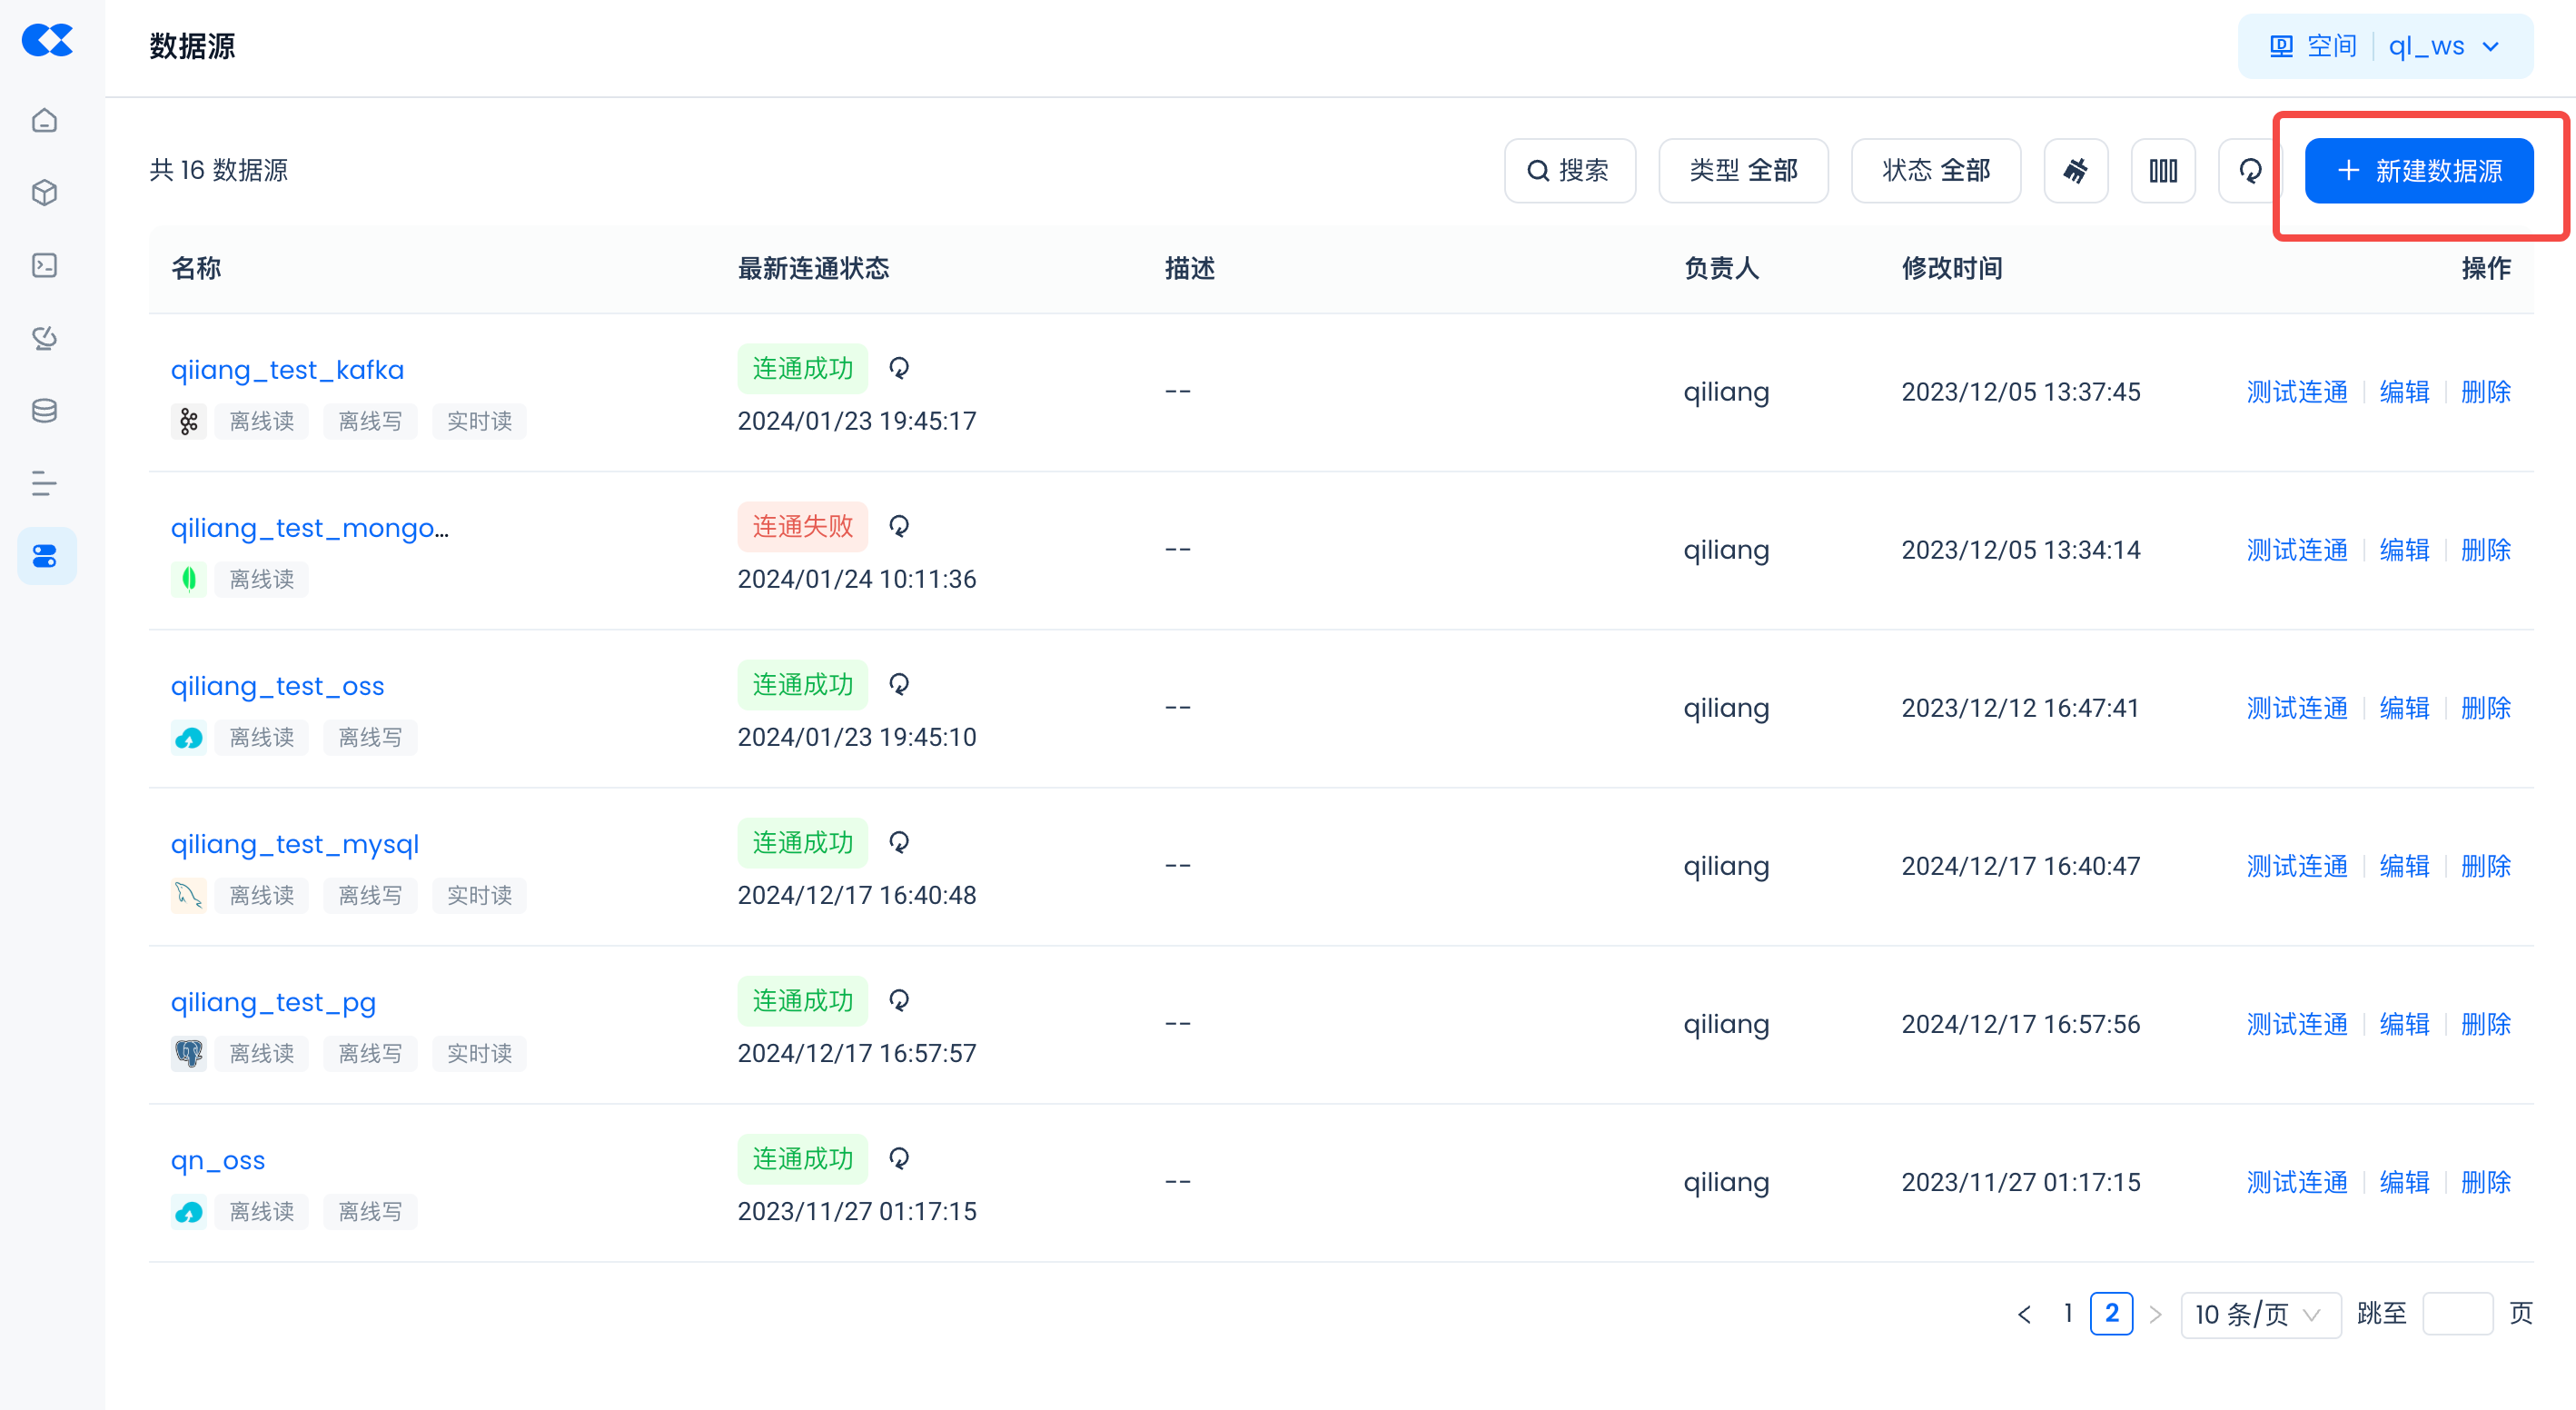
- Data Source Name: ingest_demo_from_pg
- Connection Parameters: Same as the environment connection parameters in the database environment settings.
- Please make sure to configure the correct time zone of the database to avoid data synchronization failure.
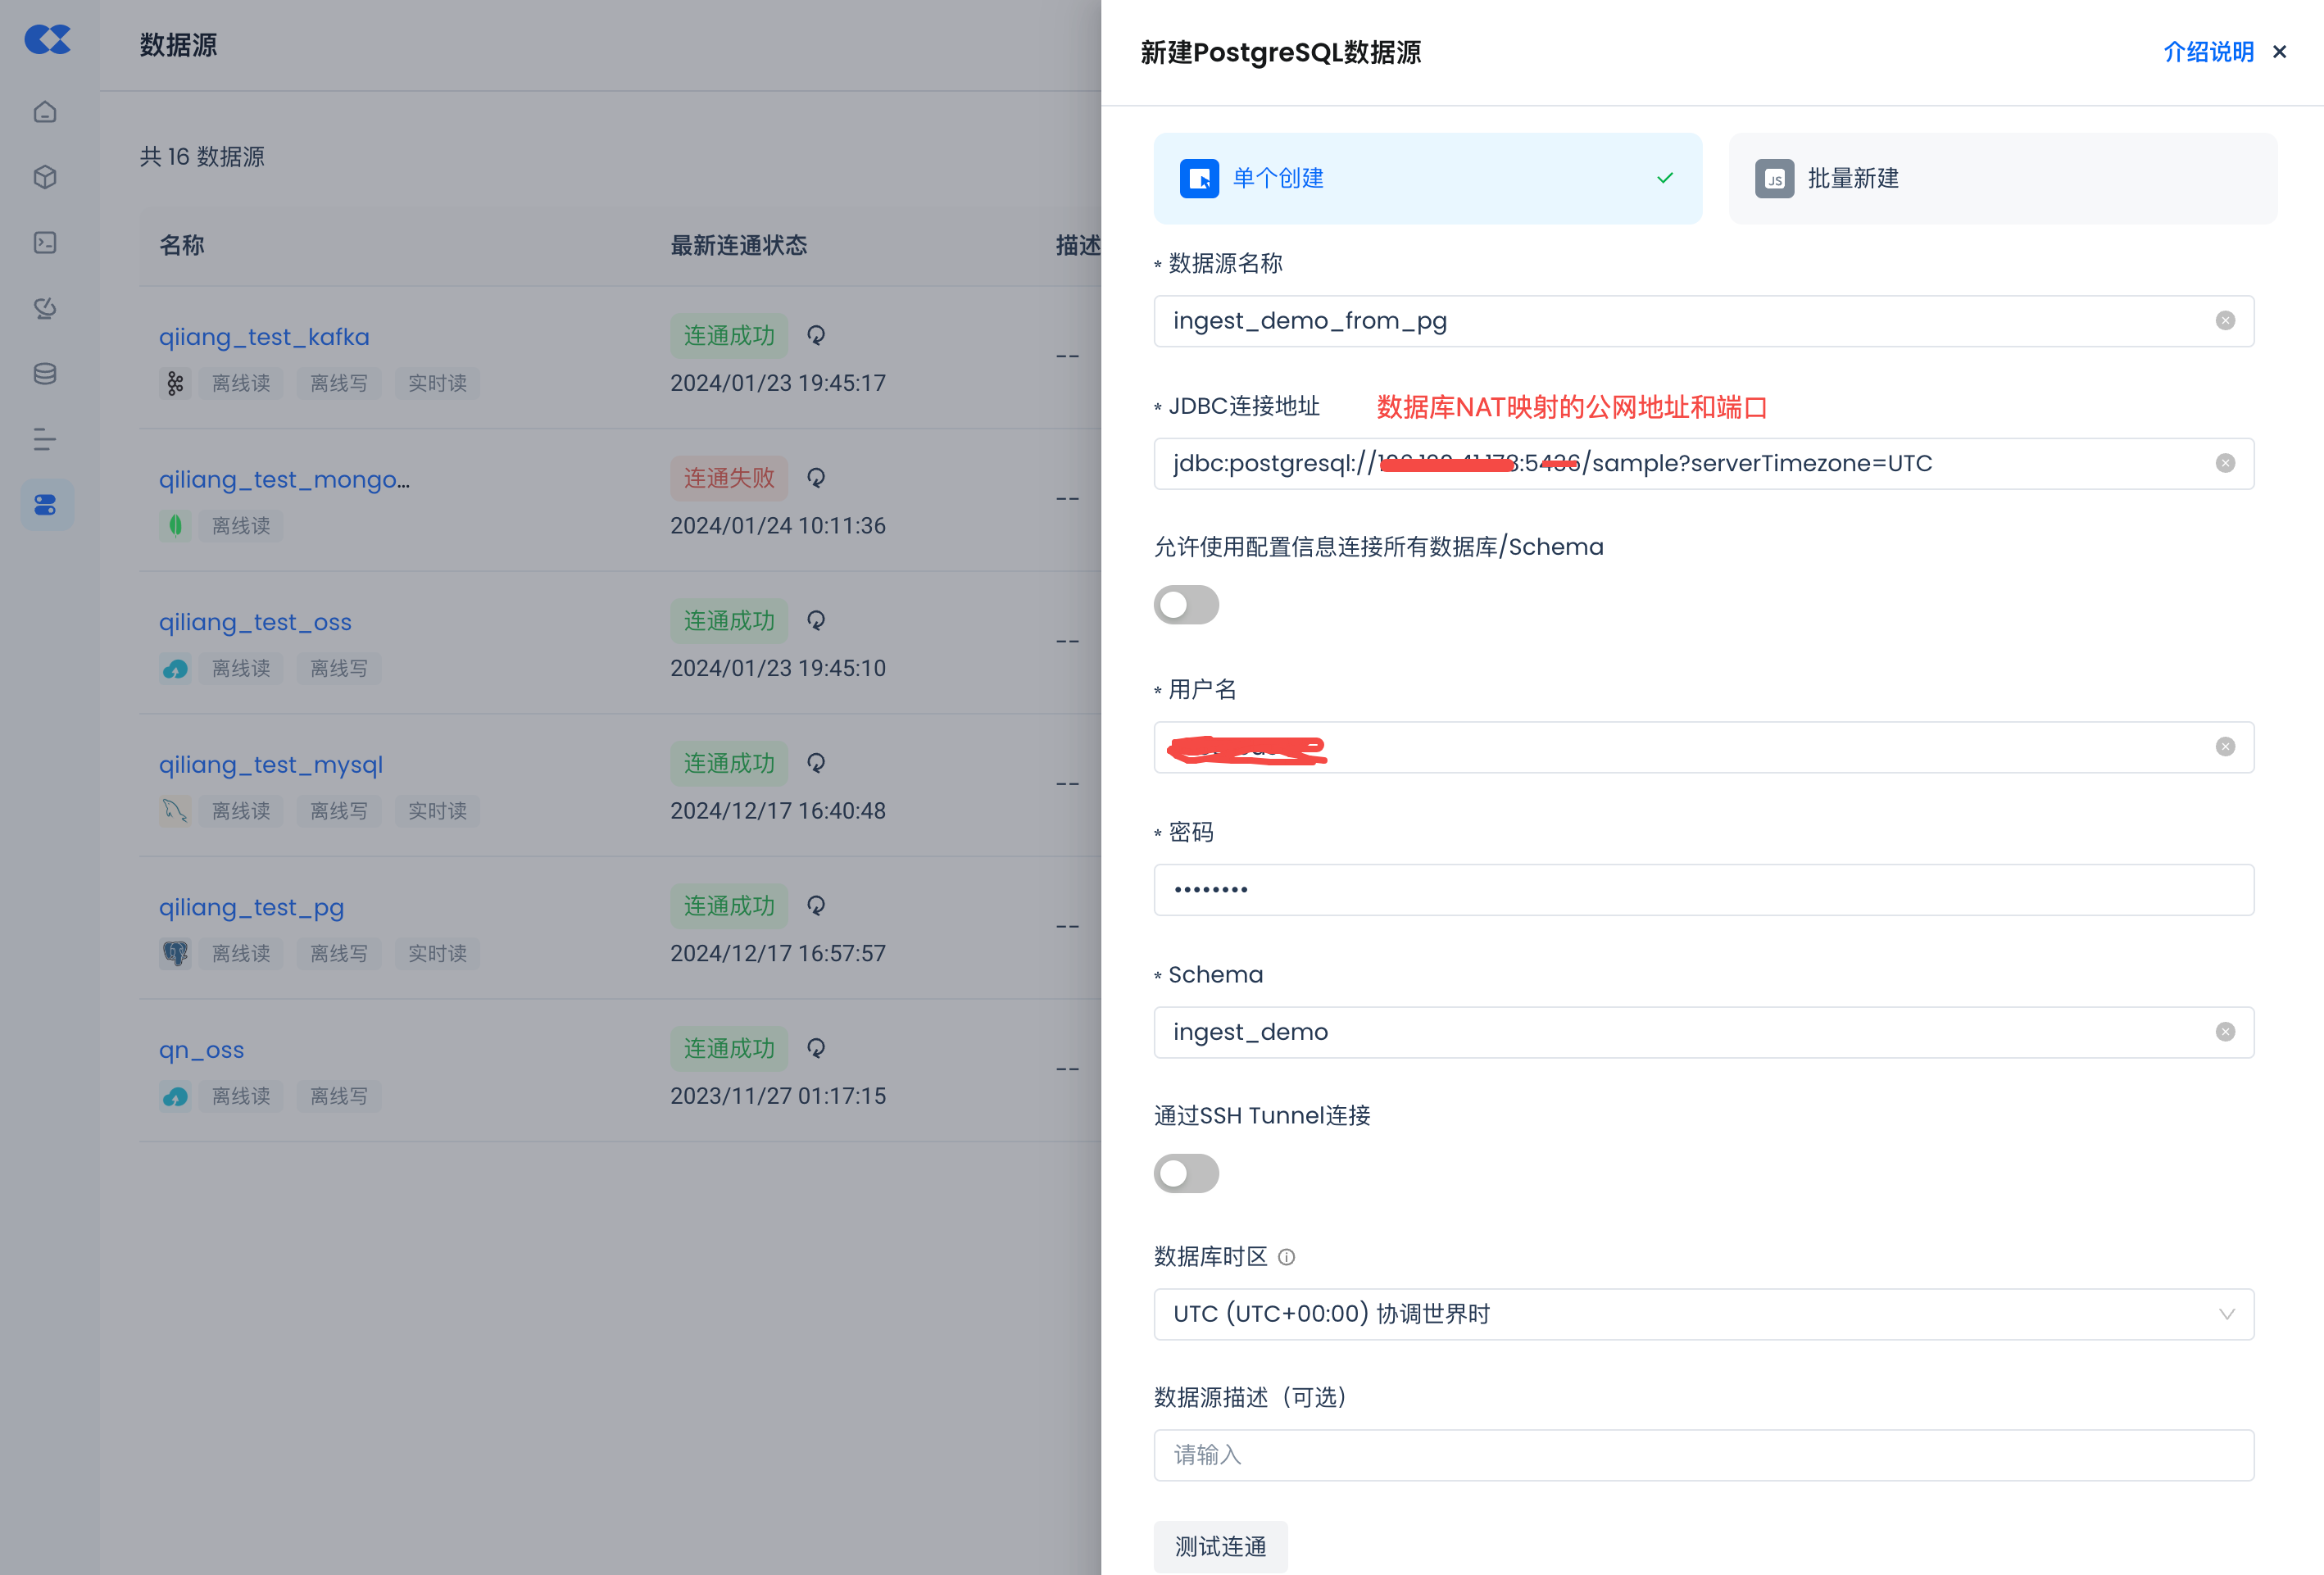
Once the environment is created, it can be used.
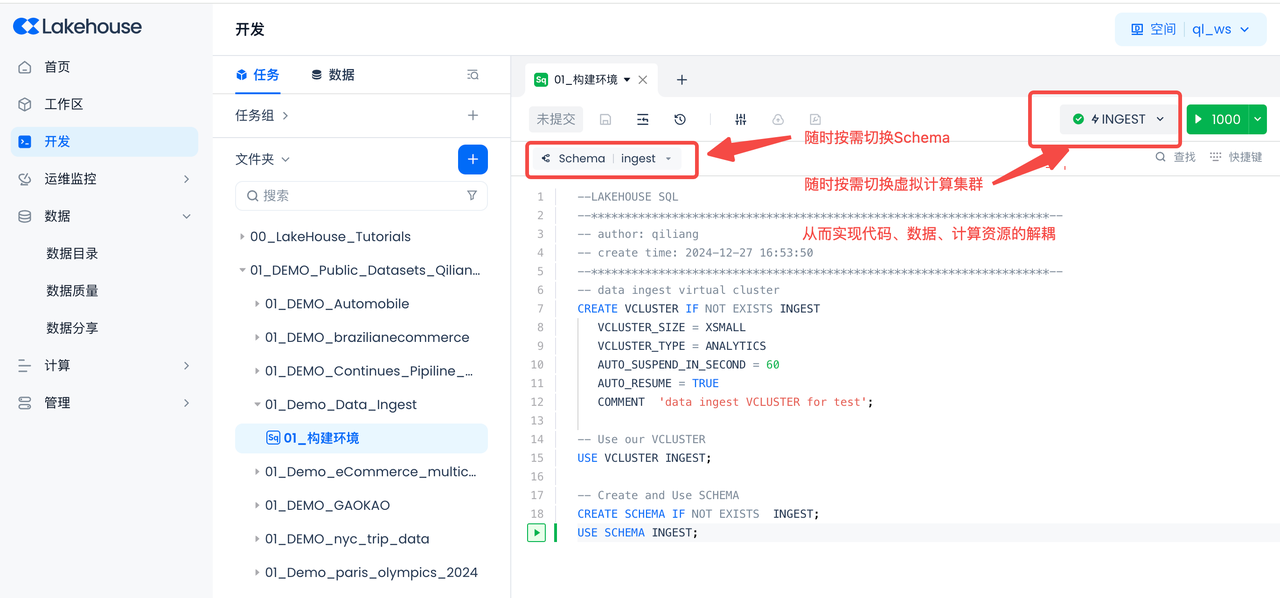
Test the connection, and if it prompts success, it means the configuration is successful.


