
Importing Data from Feishu
How to Import Feishu Spreadsheet Data into Lakehouse
1. Prerequisites
Feishu app creation: Obtain app credential information
Singdata Lakehouse account information: Log in to the Singdata web console to create script tasks for data import
Target spreadsheet type confirmation: This part is very important! You need to determine the required permissions based on the target spreadsheet type.
2. Feishu App Creation and Configuration
Create a Feishu App
Step 1: Log in to Feishu Open Platform
Visit: https://open.feishu.cn/
Log in with your Feishu account
Click "Enter Developer Console" in the upper right corner

Step 2: Create an App
Click "Create App"
Select "Enterprise Self-built App"
Fill in app information:
App Name: Singdata Data Sync App
App Description: Sync Feishu spreadsheet data to Singdata Lakehouse
App Icon: Upload an app icon (optional)
Step 3: Obtain App Credentials
After creation, on the "Credentials & Basic Info" page in the left menu, record:
App ID: cli_xxxxxxxxxx
App Secret: xxxxxxxxxxxxxxxx
Configure App Permissions
Before configuring permissions, first confirm the file type you need to import, and enable the corresponding permissions based on Feishu documentation requirements. This article uses spreadsheets (sheets) as an example. For details, refer to the Feishu API documentation
Step 1: Request Permission Scope
Enter the "Permission Management" page
Search and add the following permissions:
Spreadsheet-related permissions:
sheets:spreadsheet - View, comment, edit, and manage spreadsheets
sheets:spreadsheet:readonly - View spreadsheets
drive:drive - View cloud document folders
Specific operations:
Step 2: Request Permission Approval
Click "Create Version"
Fill in the version description: Data sync feature launch
Submit for review (if it is an internal enterprise app, it is usually automatically approved)
Step 3: Publish the App
After approval, click "Apply for Online Release"
Select release scope:
Visible to All: Recommended
Specified Departments: Choose as needed
Obtain Spreadsheet Access Permission
Note: For enterprise users, in addition to configuring permissions in the app development settings, you also need to grant app access permissions within the document.
-
Open the target Feishu spreadsheet
-
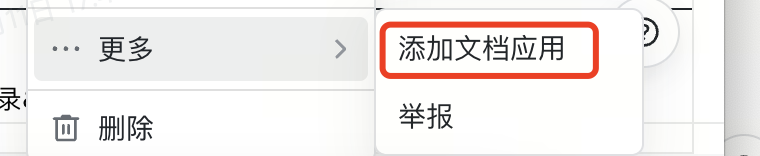
Click the ... in the upper right corner -> Select More -> Add Document App
-
Configure document app permissions Search for app name: Singdata Data Sync App Set permission: Editable (ensures data can be read)
Record Key Information
App Credentials: The identity and security credentials for the Feishu Open Platform app
- App ID: cli_xxxxxxxxxx
- App Secret: xxxxxxxxxxxxxxxx
tenant_access_token: The credential used by self-built apps on the Feishu Open Platform to access tenant resources. Maximum validity period is 2 hours.
Information required in data resource URLs: For example, for spreadsheet URLs: https://open.feishu.cn/open-apis/sheets/v2/spreadsheets/:spreadsheetToken/values/:range
- spreadsheetToken: The token of the spreadsheet
- Range: Format is
!<start_position>:<end_position>.
3. Importing Feishu Data into Singdata Lakehouse
Method 1: Import Feishu Data Using a Python Script
Step 1: Create a Python Task in Singdata Studio
- Log in to the Singdata Lakehouse console
- Go to "Development" -> "Python Tasks"
- Click "New Task"
- Configure task info: Task Name: Feishu Data Sync, Task Description: Import data from Feishu spreadsheet to Lakehouse
Step 2: Configure Code Parameters
Step 3: Configure Schedule for Periodic Execution (Optional)
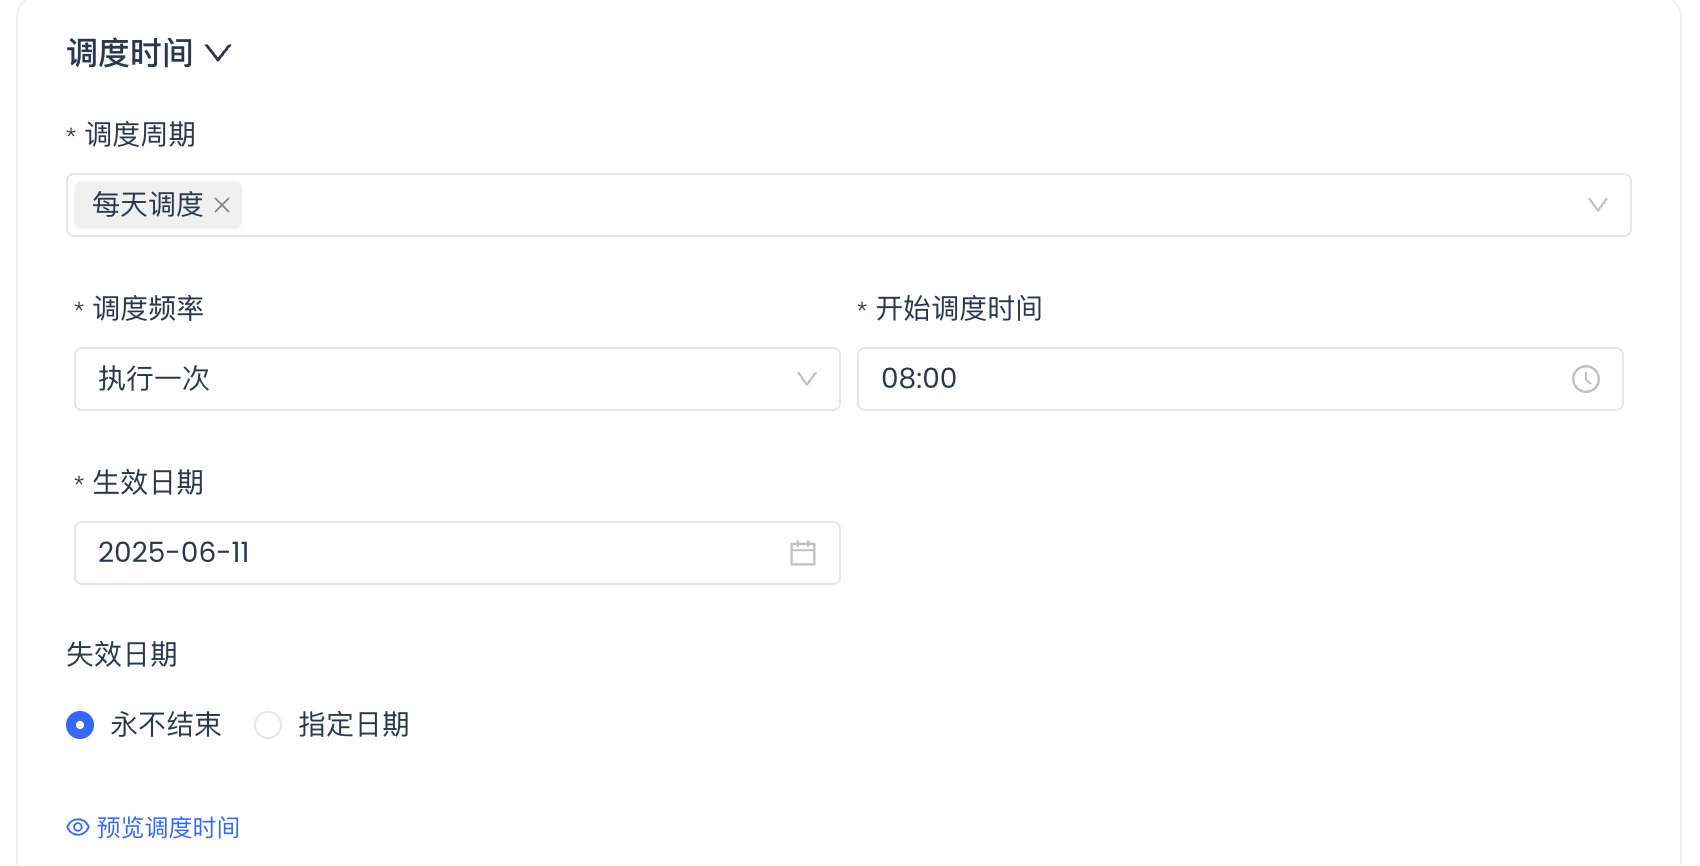
If you need to periodically pull data from the spreadsheet, you can directly configure the schedule for this Python task.
For example: To pull the latest data at 8:00 AM every day, configure as follows:
- Schedule cycle: Daily
- Schedule frequency: Execute once, Start time: 08:00
- Effective date: 2025-06-11 (the date you want the task to start running)
Method 2: Import Feishu Data Using an Offline Sync Task
Currently, the offline task method does not support periodic data extraction; only manual trigger execution is supported.
Step 1: Obtain tenant_access_token
You can use a Python script to obtain the tenant_access_token.
- Log in to the Singdata Lakehouse console
- Go to "Development" -> "Python Tasks"
- Click "New Task"
Configure task info:
Task Name: Get Feishu tenant_access_token
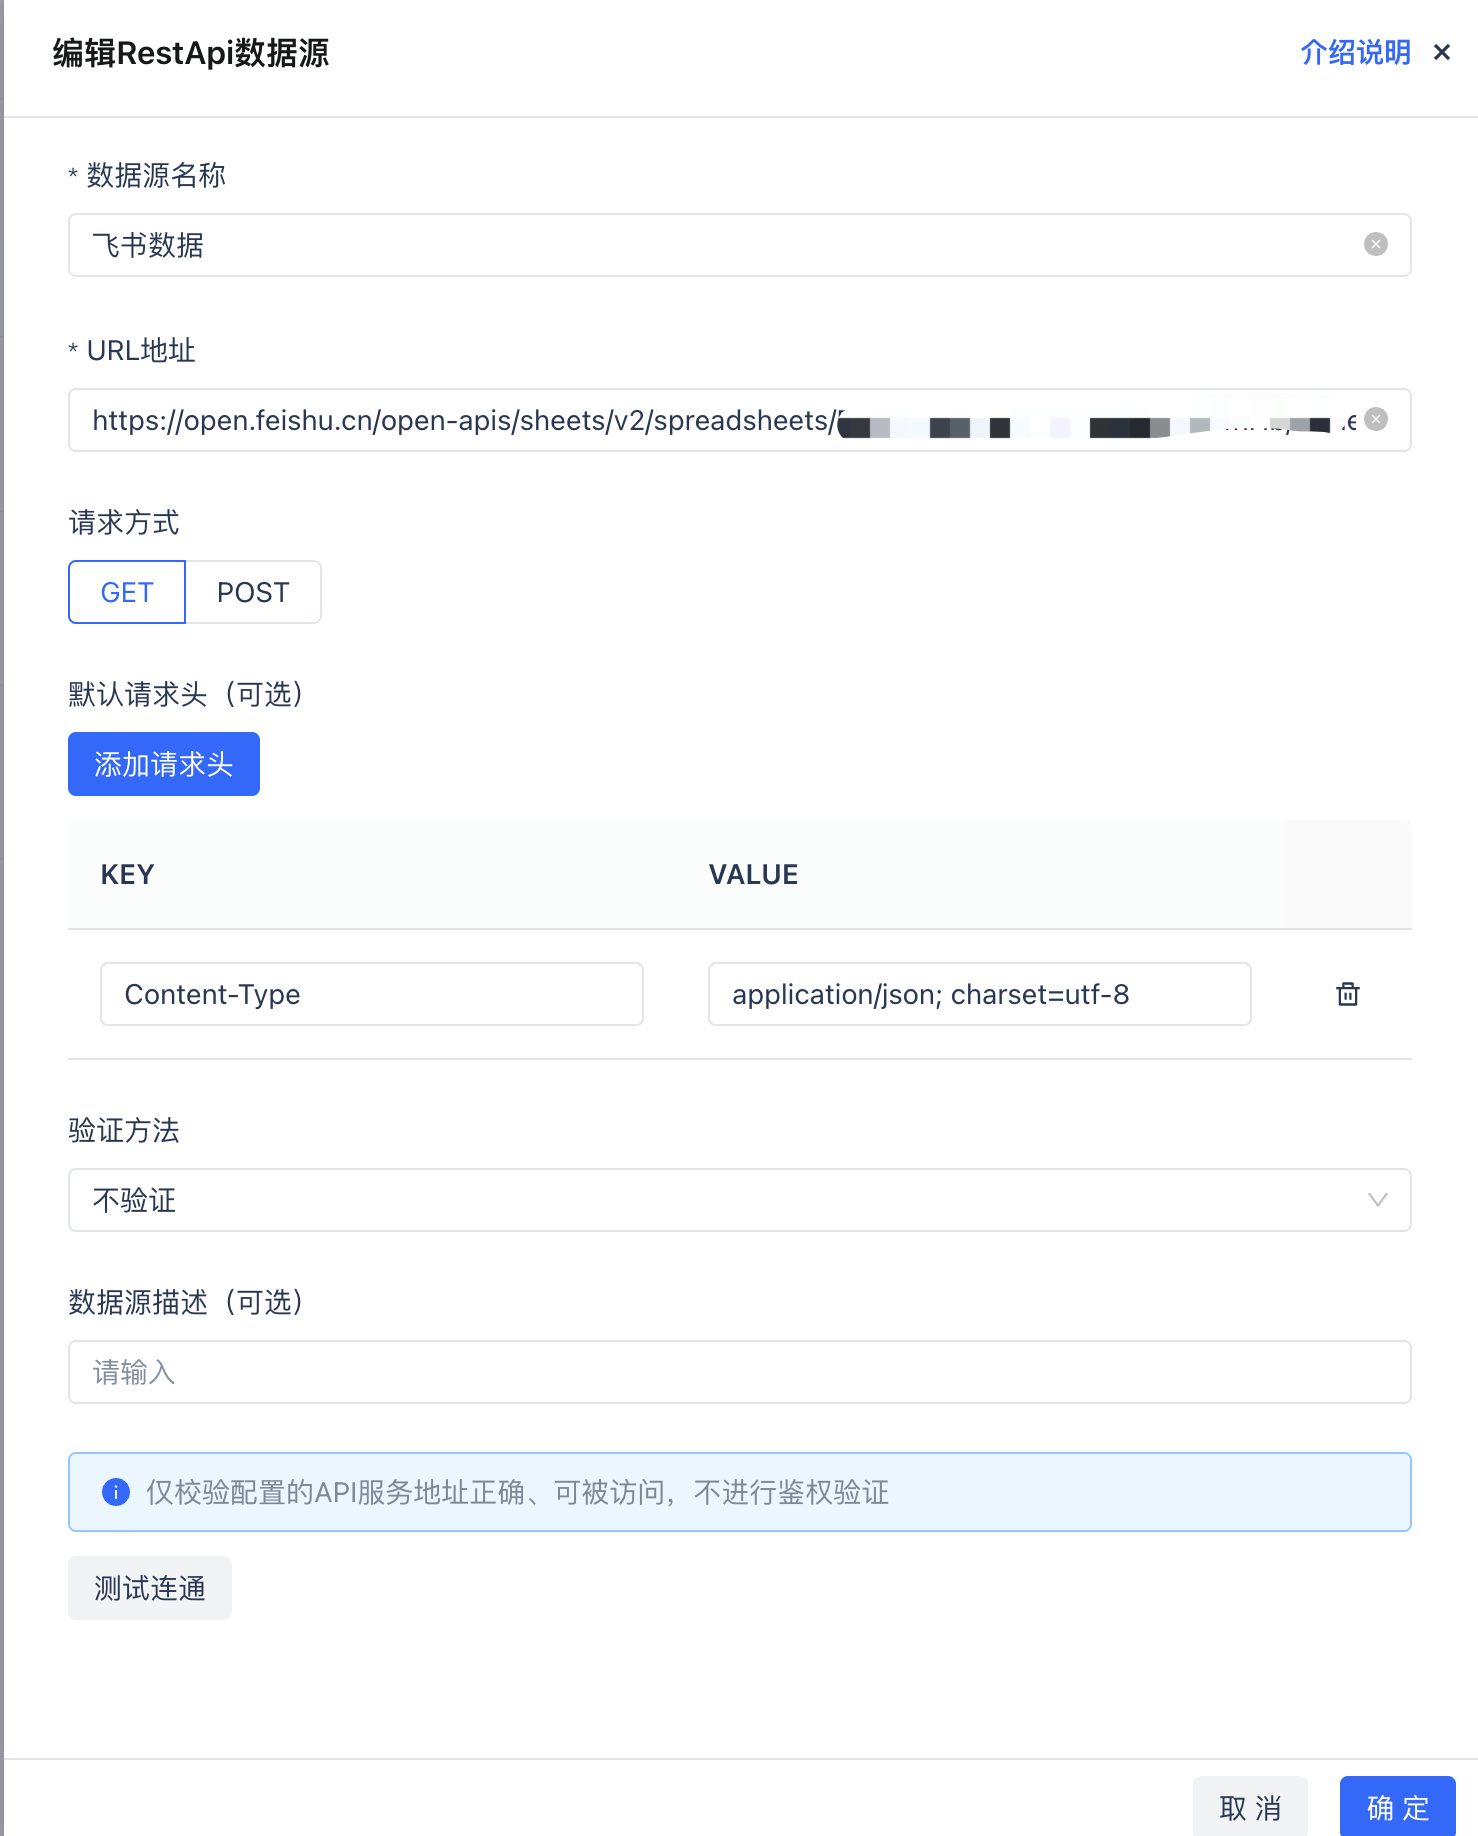
Step 2: Create Feishu Data Source Using RestApi
- Log in to the Singdata Lakehouse console
- Go to "Administration - Data Sources"
- Create a new data source, select RestApi
Step 3: Create an Offline Sync Task to Sync Data
- Log in to the Singdata Lakehouse console
- Go to "Development" -> "Offline Sync"
- Click "New Task"
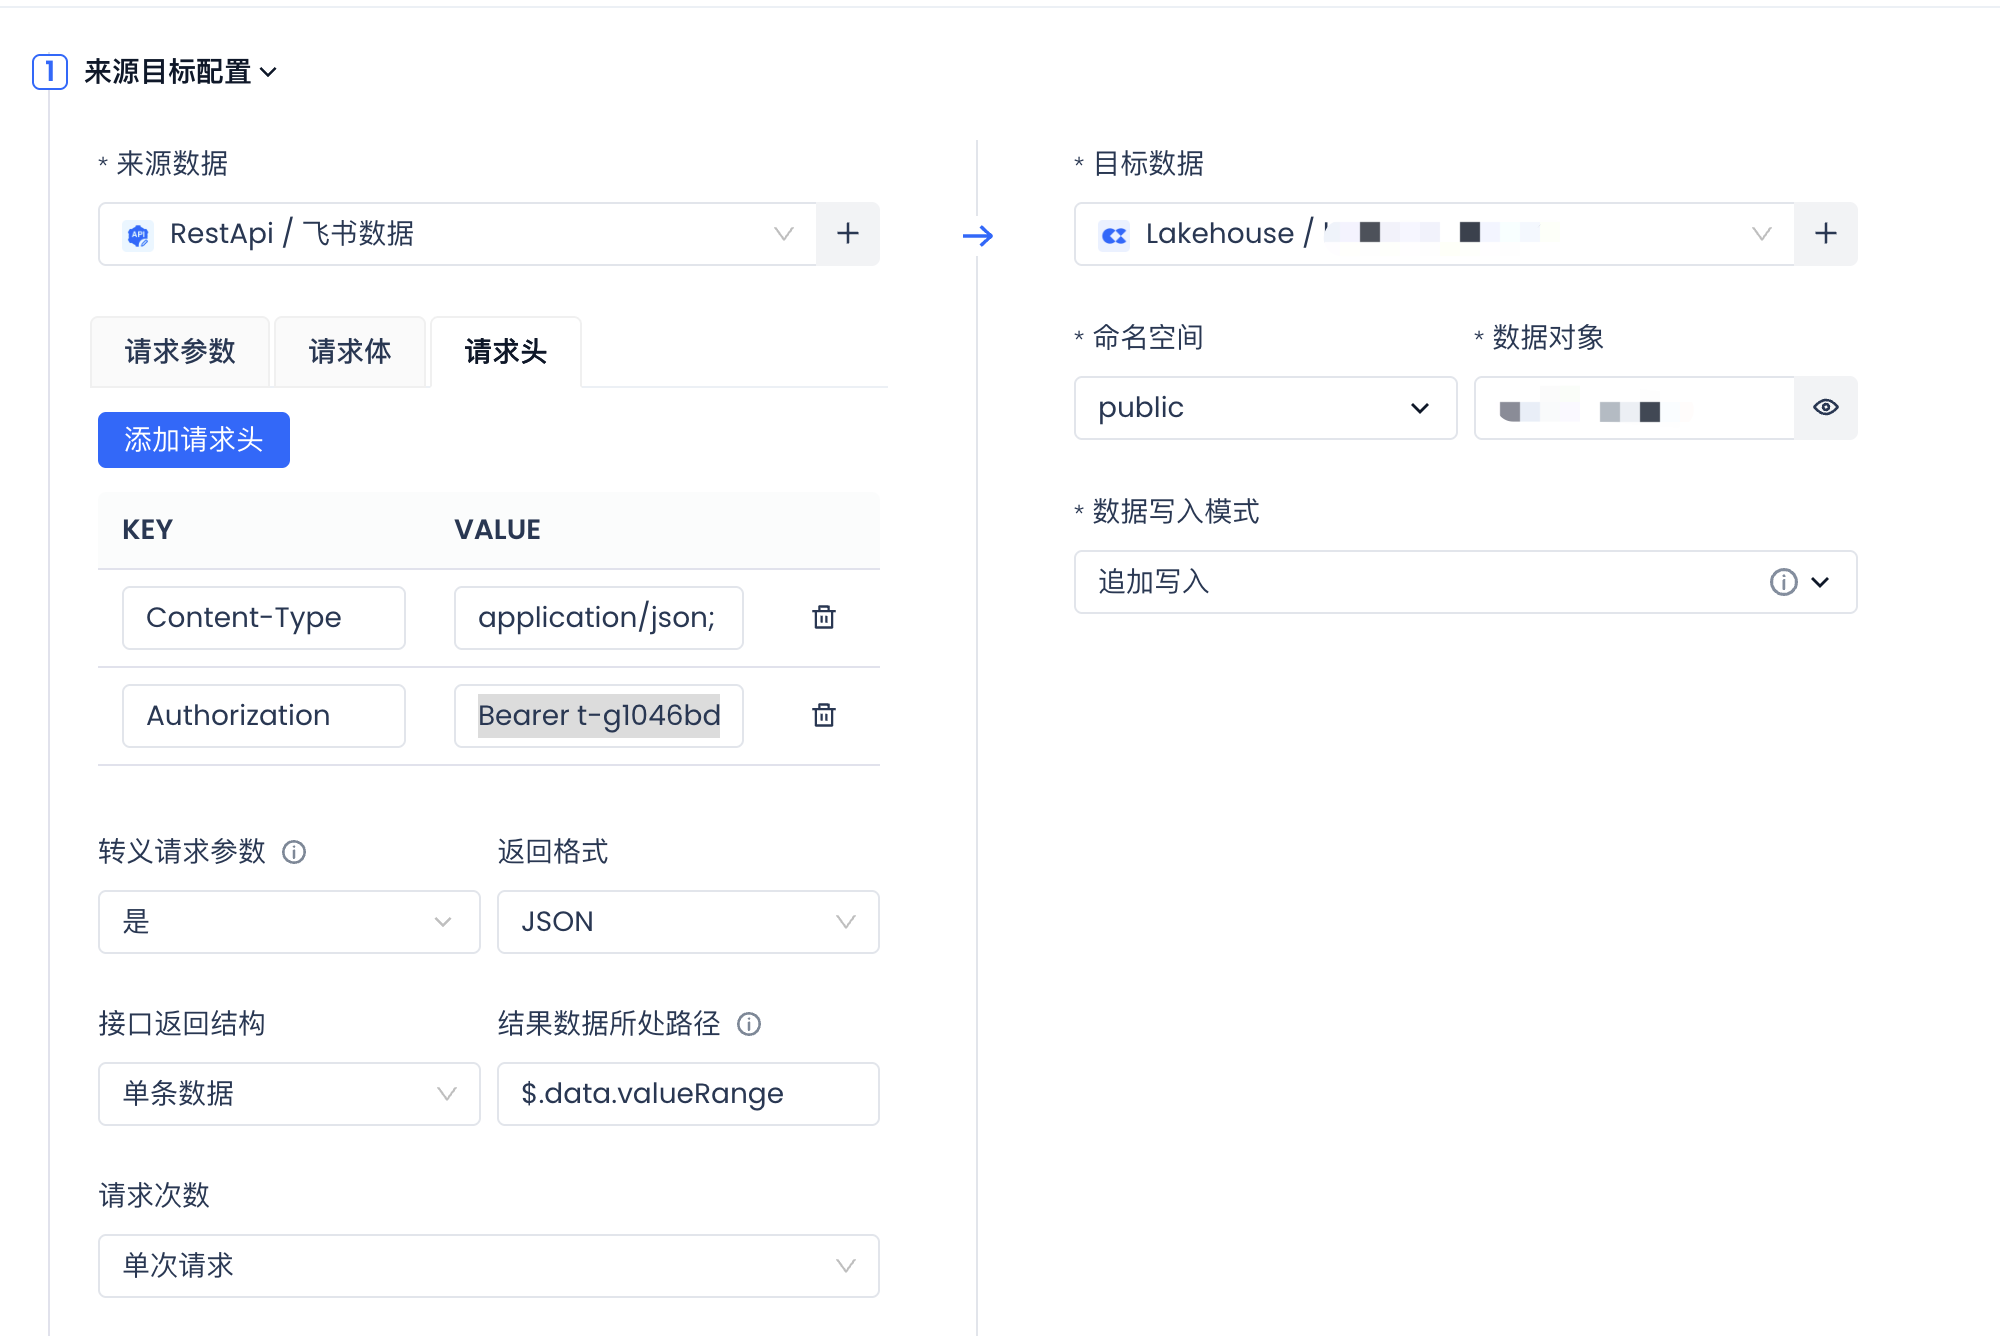
| Field Mapping Configuration: Nested array format JSON parsing is not currently supported. Therefore, for data returned by the Feishu API, only value values can be imported into the target table as string type. |
|---|

Step 4: Data Processing - Parse Imported String Fields into Standardized Tables
- Prerequisite: Users need to define the table structure in advance.
- Log in to the Singdata Lakehouse console
- Go to "Development" -> "SQL Tasks"
- Click "New Task"
4. FAQ
Q1: What is the difference between using a Python script and an offline task to import Feishu data?
Python script import: Supports periodic scheduling for data from Feishu spreadsheets, but requires users to be familiar with Python syntax.
Offline task import: Provides a no-code page configuration with a lower barrier to entry. However, periodic scheduling is not currently supported; it will be supported in future versions.
Q2: I keep getting permission errors during development
Check whether the relevant permissions are configured correctly.
In the Feishu app: Whether the correct permissions have been configured based on the file type. Note that the permissions for sheets and wikis in the URL are different; make sure to select the correct permission points.
Whether it has been published and approved after configuration: After configuring permissions, users also need to click "Publish" and wait for administrator approval before the permission points take effect.
Whether access permissions have been configured for the app within the Feishu document. This step is very important! Enterprise users must complete this configuration to access via the API.